AWS Lambda Assignment
Author
This assignment was written by Shubh Srivastava. You can connect with me on my Linkedin or view my work on my Github.
Tools used
Index
Doc 1OverviewDoc 2Pre-requisitesTask 3AWS Lambda Function Creation and ConfigurationTask 4Packaging Local Dependencies (Zipping for Python/JS)Task 5API Gateway Setup and IntegrationTask 6Lambda Code – Query vs. Path ParametersTask 7Serverless Architecture OverviewTask 8Testing the API with Postman
Overview
Objective
Create a comprehensive step-by-step guide that covers the deployment of a serverless AWS Lambda function written in Python/JS.
Content Requirements
- Detailed explanation of serverless architecture.
- Clear instructions on AWS Lambda creation, configuration, and invocation layers.
- How to package and zip local dependencies.
- API Gateway setup including triggers (both IAM-based and open key) and CORS configuration.
- Testing the API with Postman, covering both Open API and IAM access methods.
- Use screenshots with clear markers and pointers. Blur any sensitive information in all images.
- Each Lambda response must include CORS headers in the code file.
Pre-requisites
- Active AWS account with proper permissions.
- AWS CLI installed and configured (if applicable).
- Development environment setup for Python/JS.
- Postman for API testing.
- Access to a drive/folder for the final submission with code templates and screenshot.
Task 3: AWS Lambda Function Creation and Configuration
Subtask 1 (3.1): Creating the Lambda Function
- Log in to the AWS Console and navigate to AWS Lambda.
Doing the above will log you into the user dashboard in AWS.
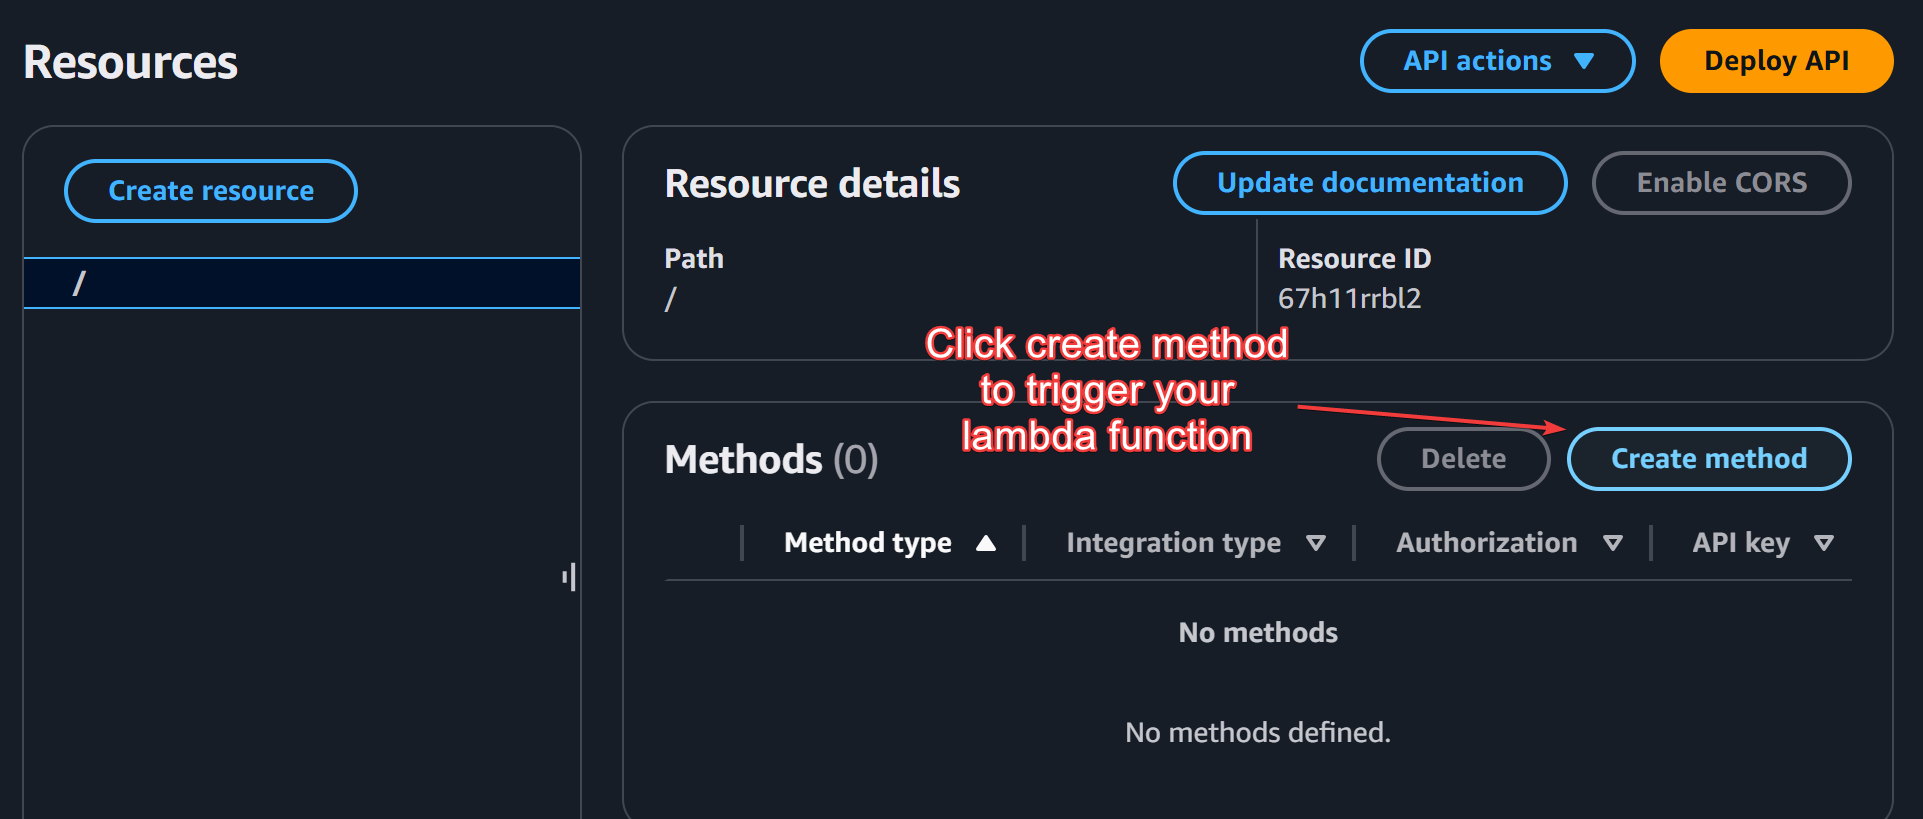
- Click "Create Function".
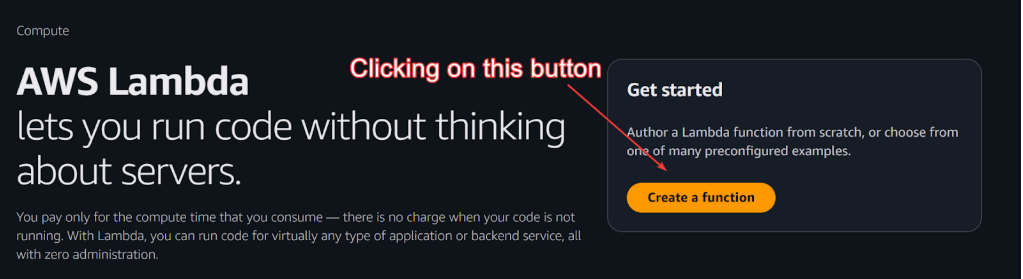
Clicking the above will take you to the “Create function” page where you can create you lambda function.
- Choose "Author from scratch" and enter the function name.
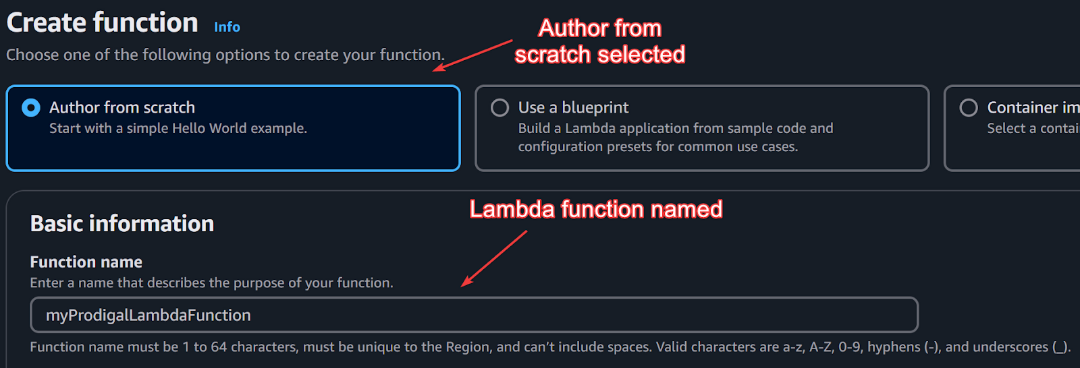
- Select the runtime (Python 3.x or Node.js 14/16+).

The above field (Runtime) is used to configure the execution environment of the lambda function. You can choose python or java versions if you are working with respective codes.
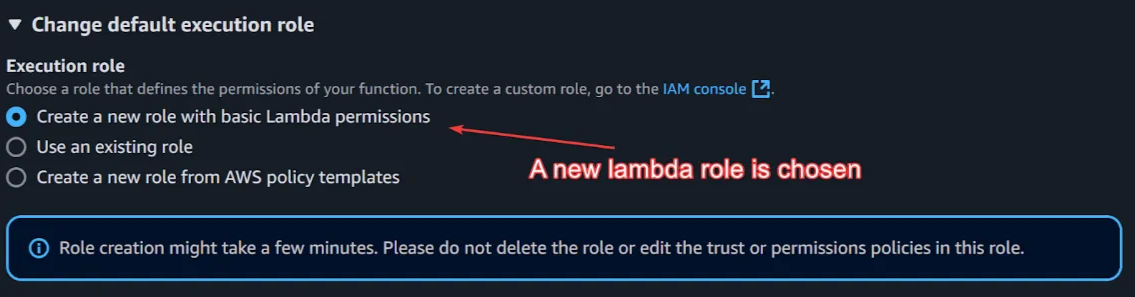
- Configure role permissions (using existing IAM roles or create a new one).

Subnet is a small section (range of IP addresses) within the VPC. A subnet can be made public (it can be accessed from outside (internet)) or private (it can be accessed through NAT gateway, bastion host, VPN etc).
Subtask 2 (3.2): Configuring the Lambda Settings
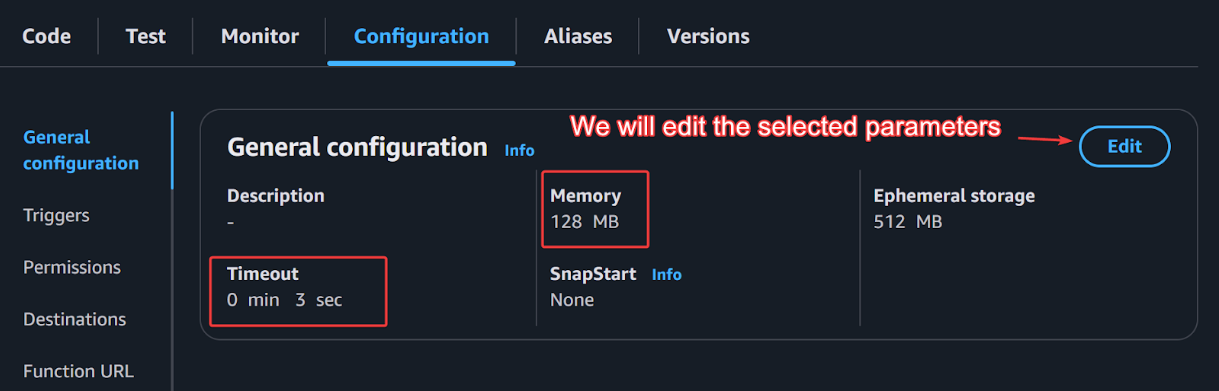
- Setting up memory allocation, timeout, and environment variables.
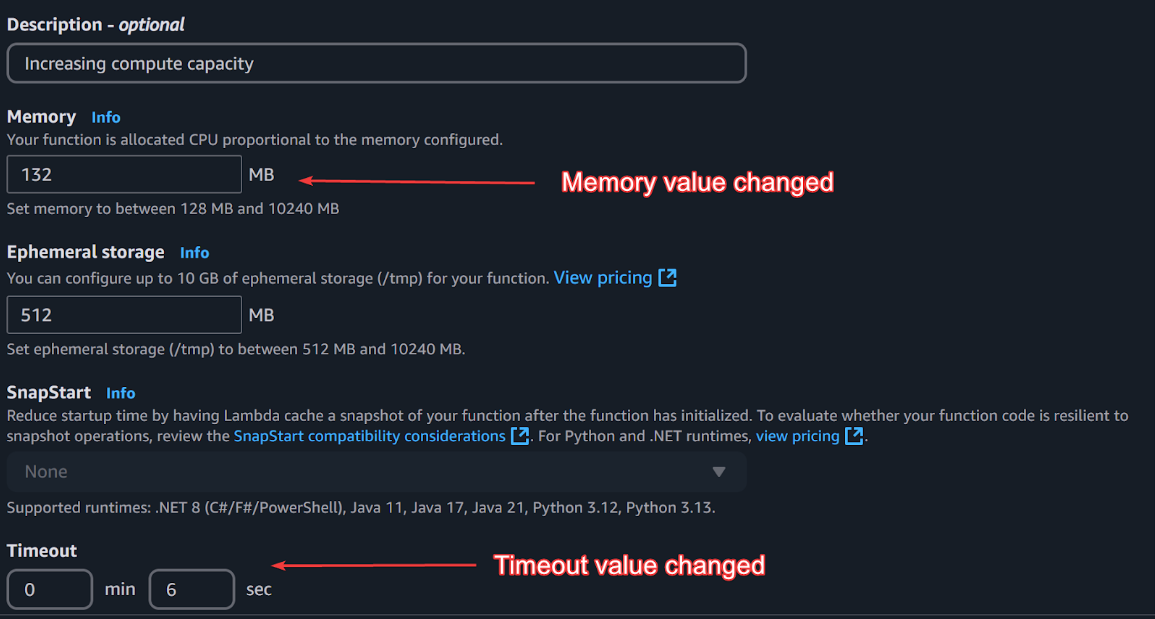
What’s the Memory field in the above image?
AWS Lambda allocates CPU power proportionally to the memory configured. By setting it to 132 MB, you're defining how much RAM your Lambda function can use. AWS recommends tuning memory based on function performance needs.
What’s the Timeout field in the above image?
The timeout setting determines how long a function can run before AWS forcefully stops it. If the function executes longer than 6 seconds, AWS Lambda will terminate it, potentially causing incomplete processing. Note that the maximum time allocated by AWS is 15 minutes.


In the above image, we are setting an environment variable. This will be available to use in the execution environment of the lambda function.
This helps in avoiding hardcoding sensitive data like API keys, database credentials, or configuration settings directly in the function code.
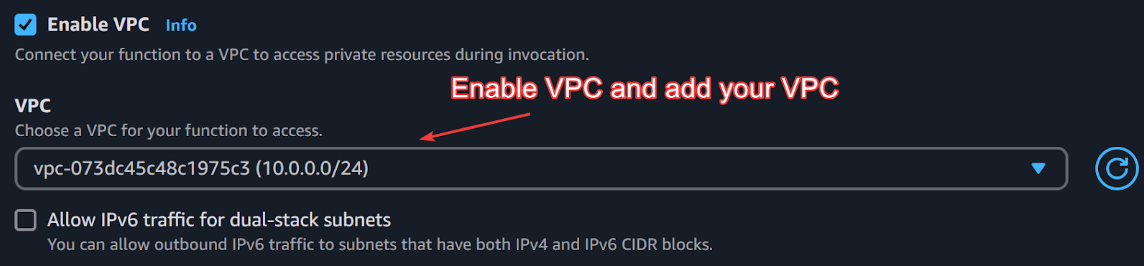
- Configuring the VPC and any required permissions.

The above image clearly shows how the VPC, subnet’s within that VPC are configured.
Subtask 3 (3.3): Invoking Layers
-
Explain how to add layers for external libraries or shared code. Demonstrate how to attach and manage layers in the Lambda function.
Click on the sidebar in the lambda dashboard. Click on layers and create layer.

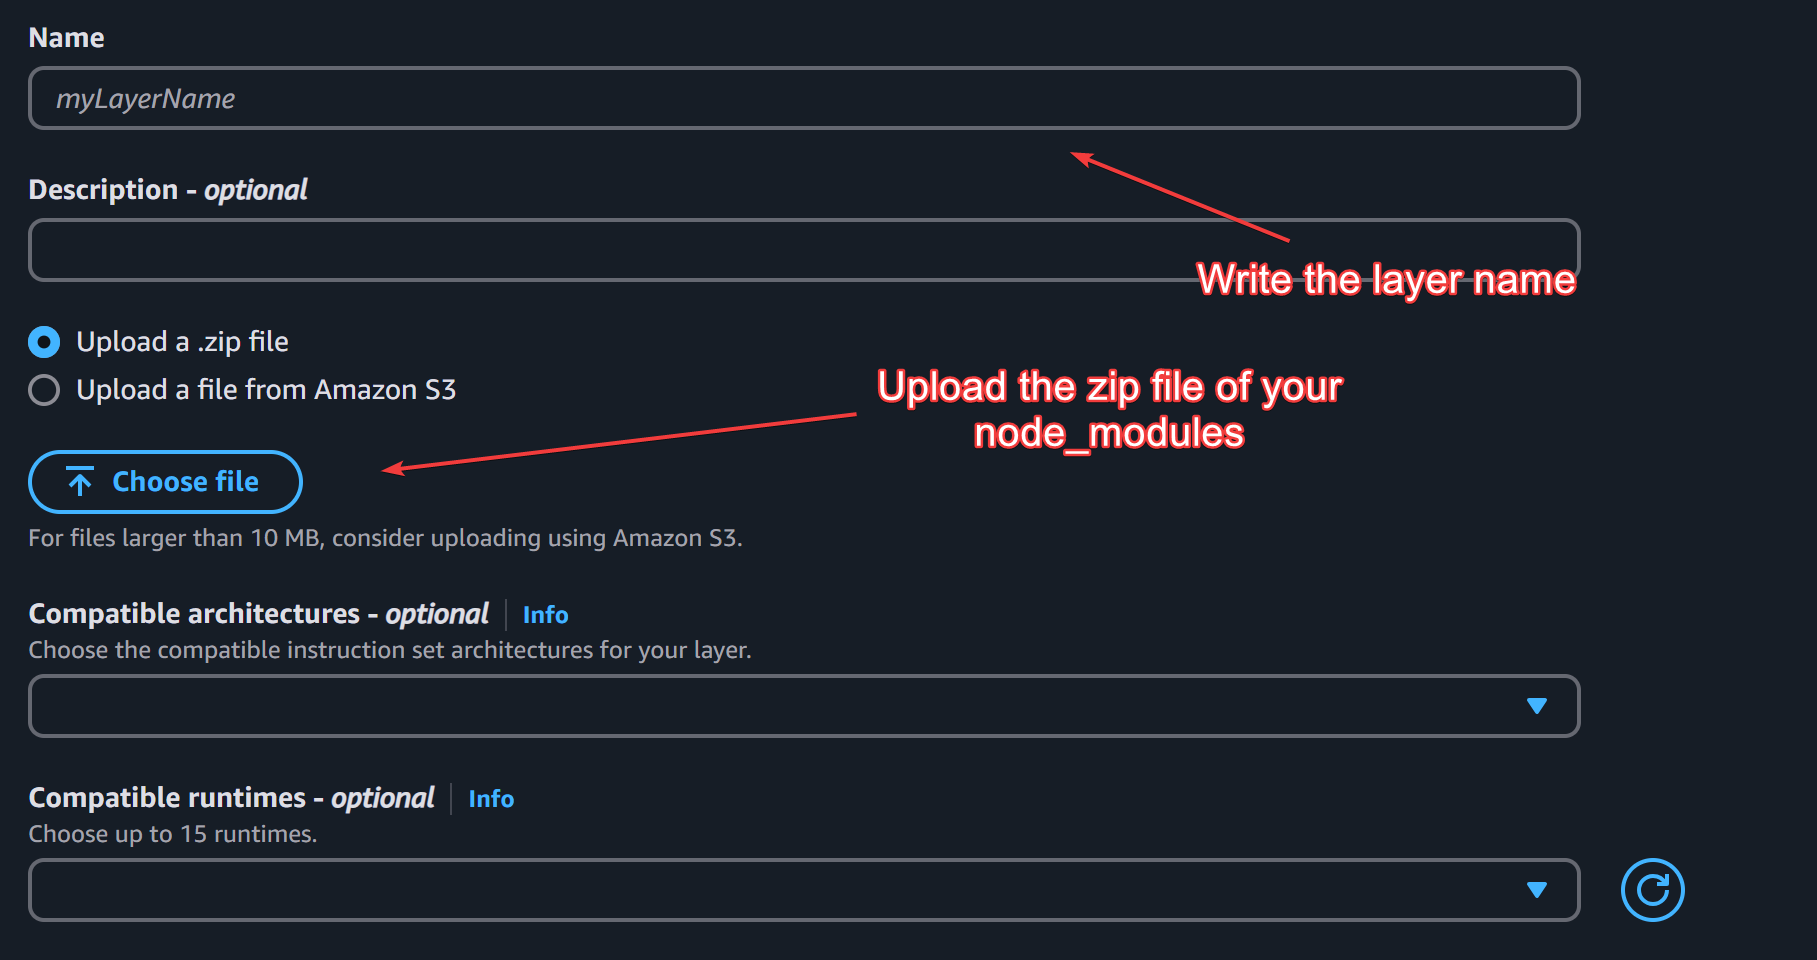
Click create and then navigate to the lambda dashboard and scroll down to add a layer field.

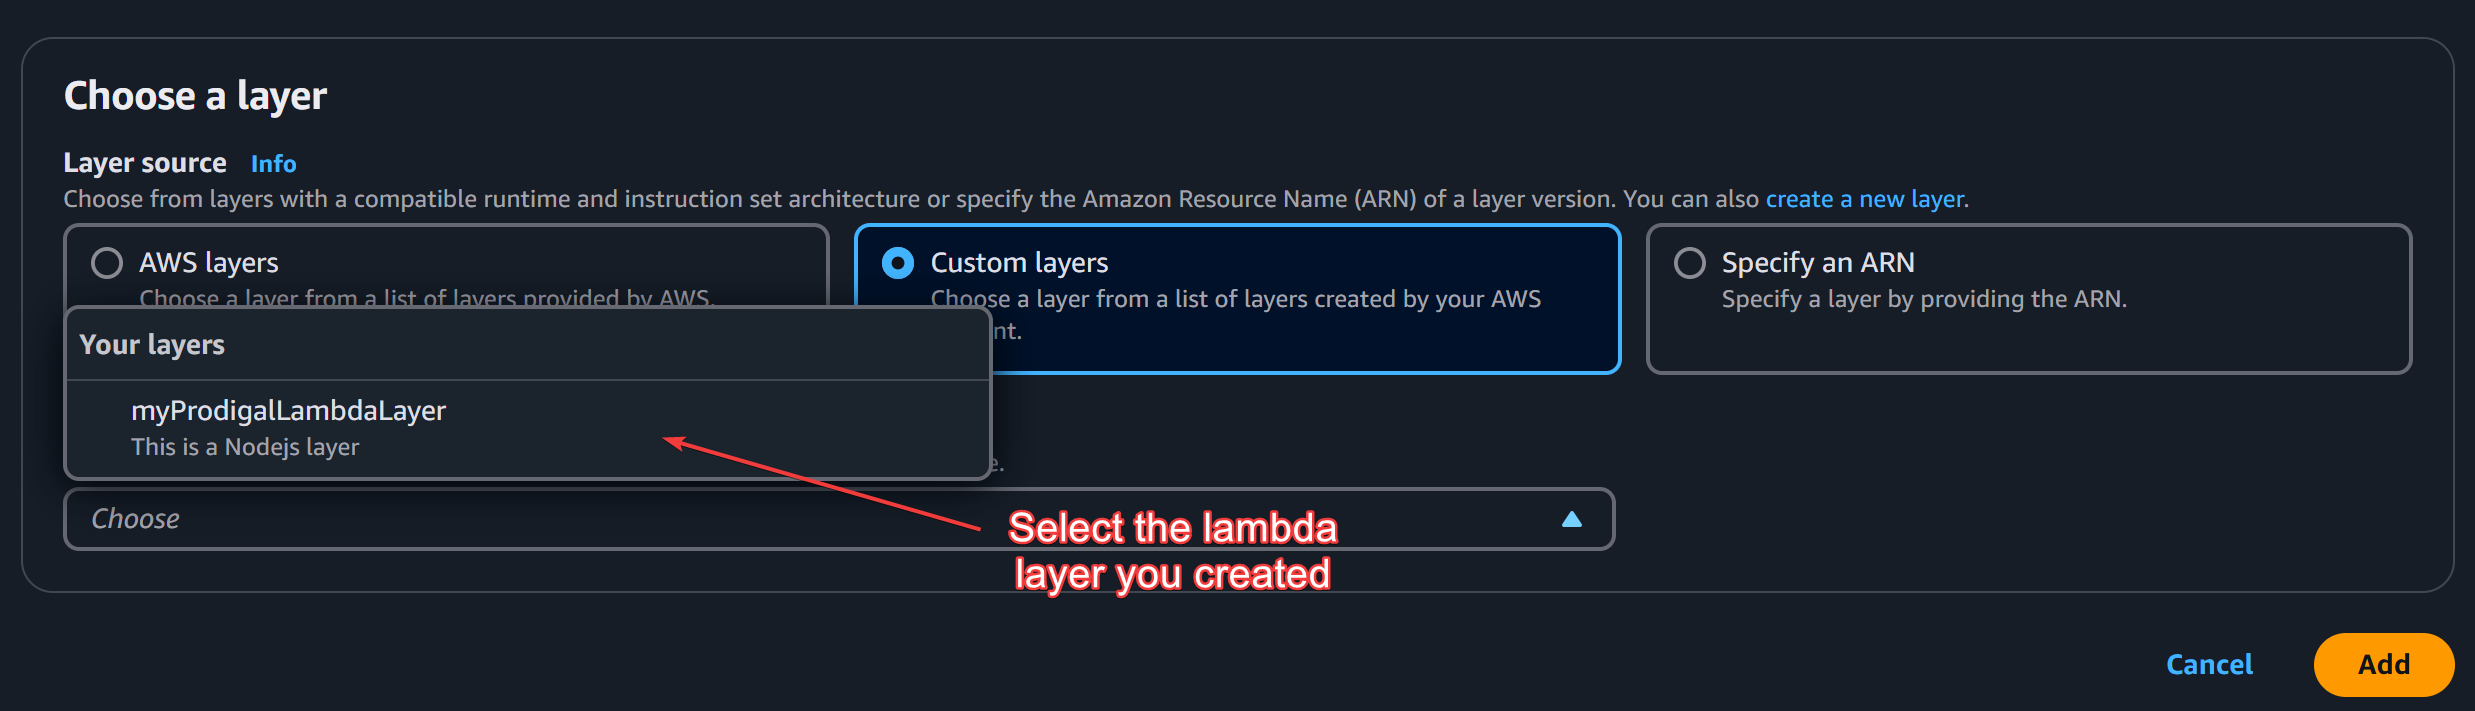
Add your layer and hit add button.
Task 4: Packaging Local Dependencies (Zipping for JS/py)
For Python:
- Package your code along with the
requirements.txtdependencies. - Use virtual environments and run:
pip install -r requirements.txt -t ./package - Zip the package directory and your Lambda code file
For JavaScript:
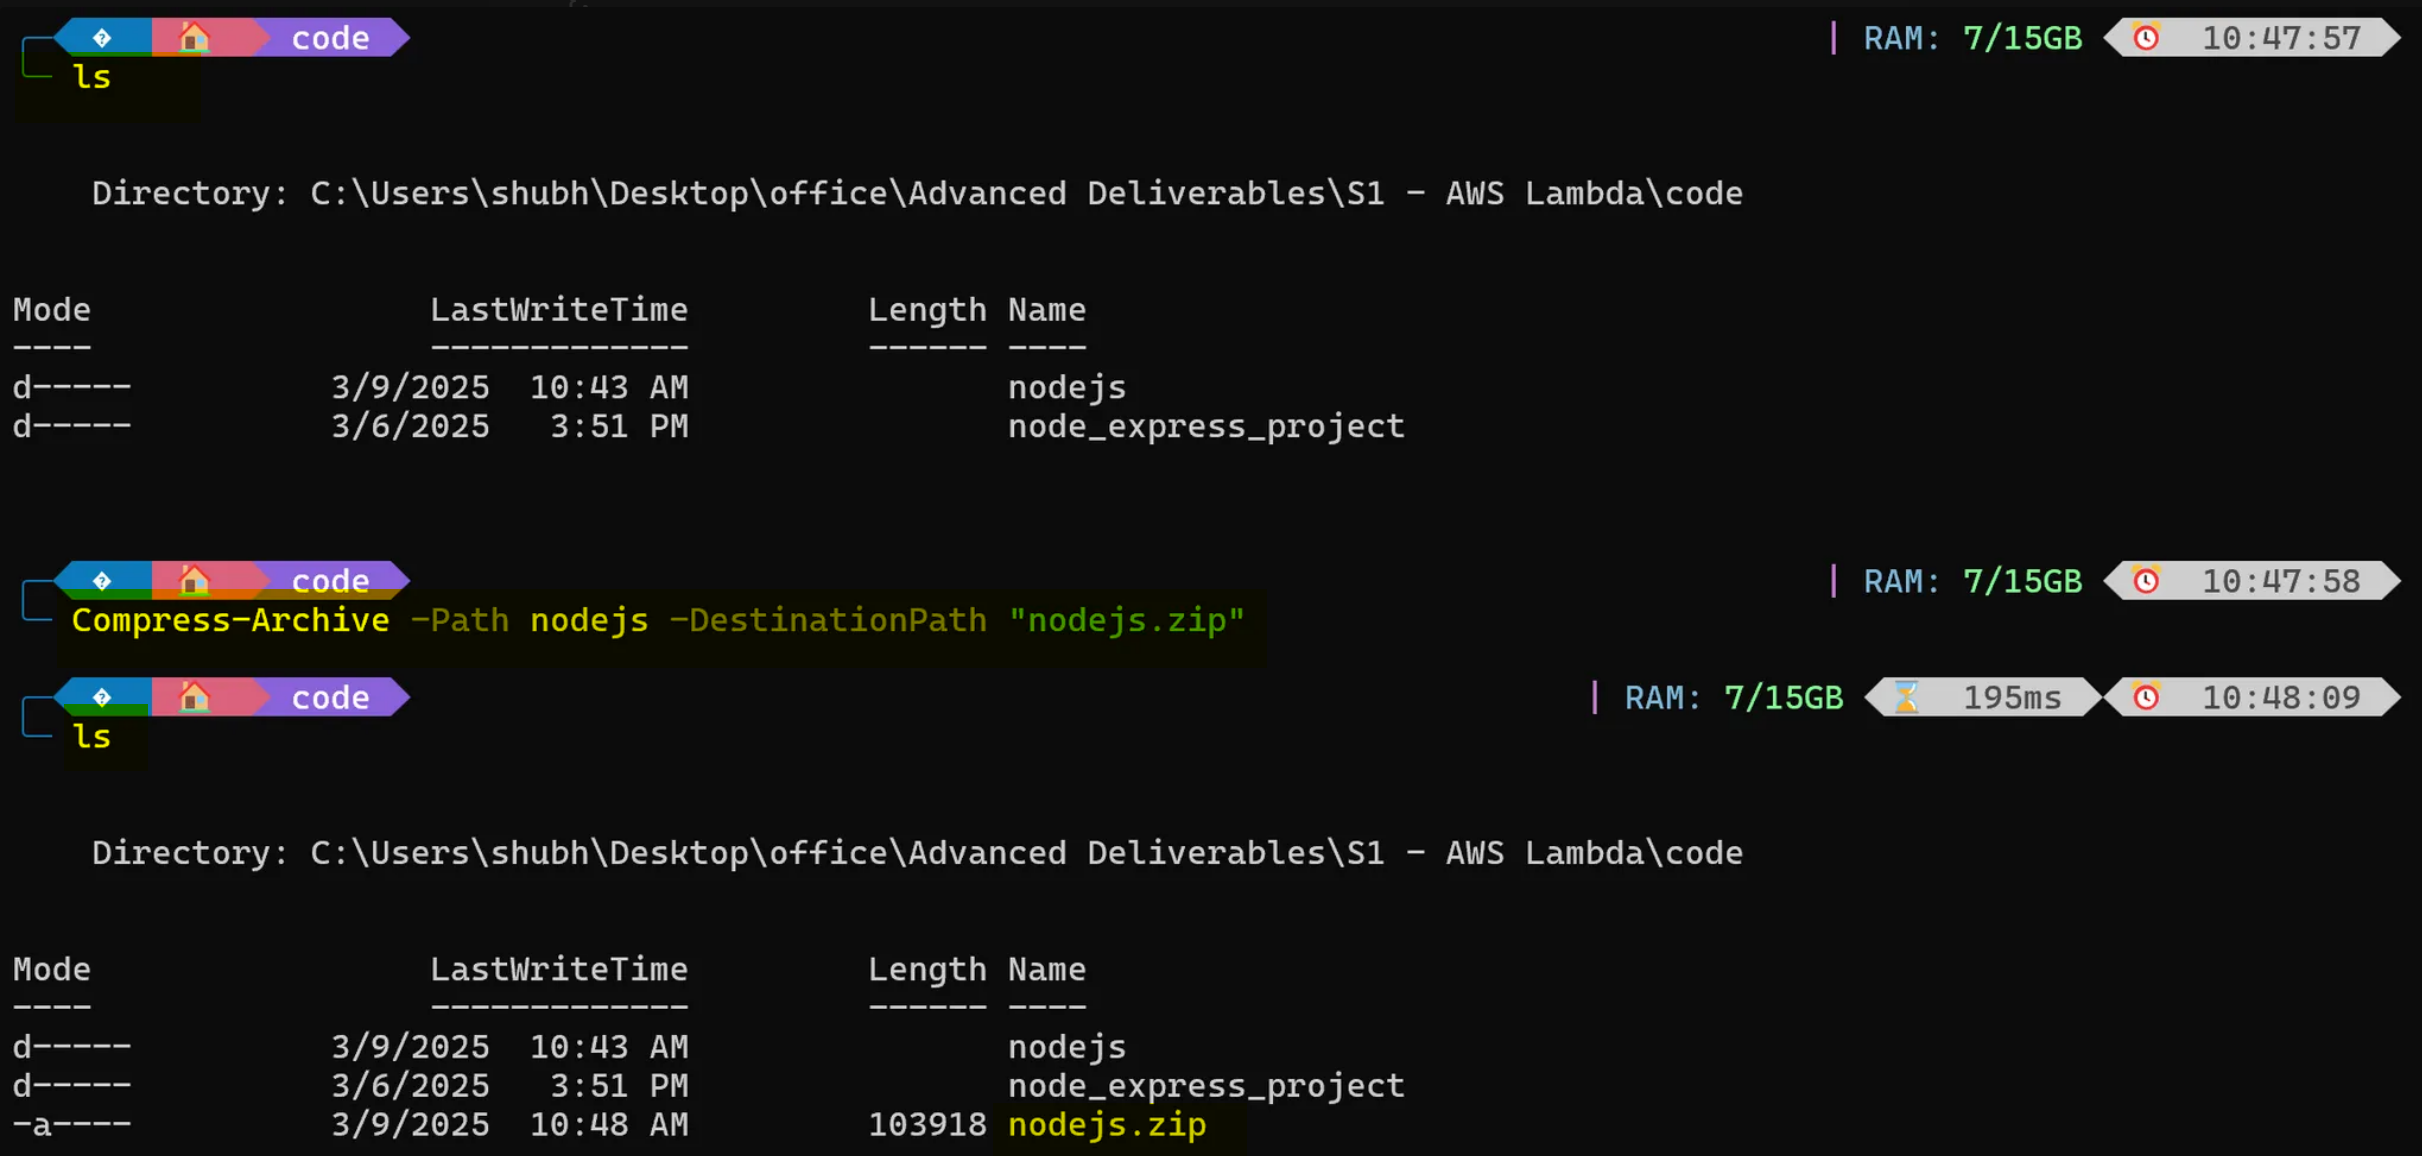
- Install dependencies using npm.
- Zip the
node_modulesfolder along with your Lambda code.
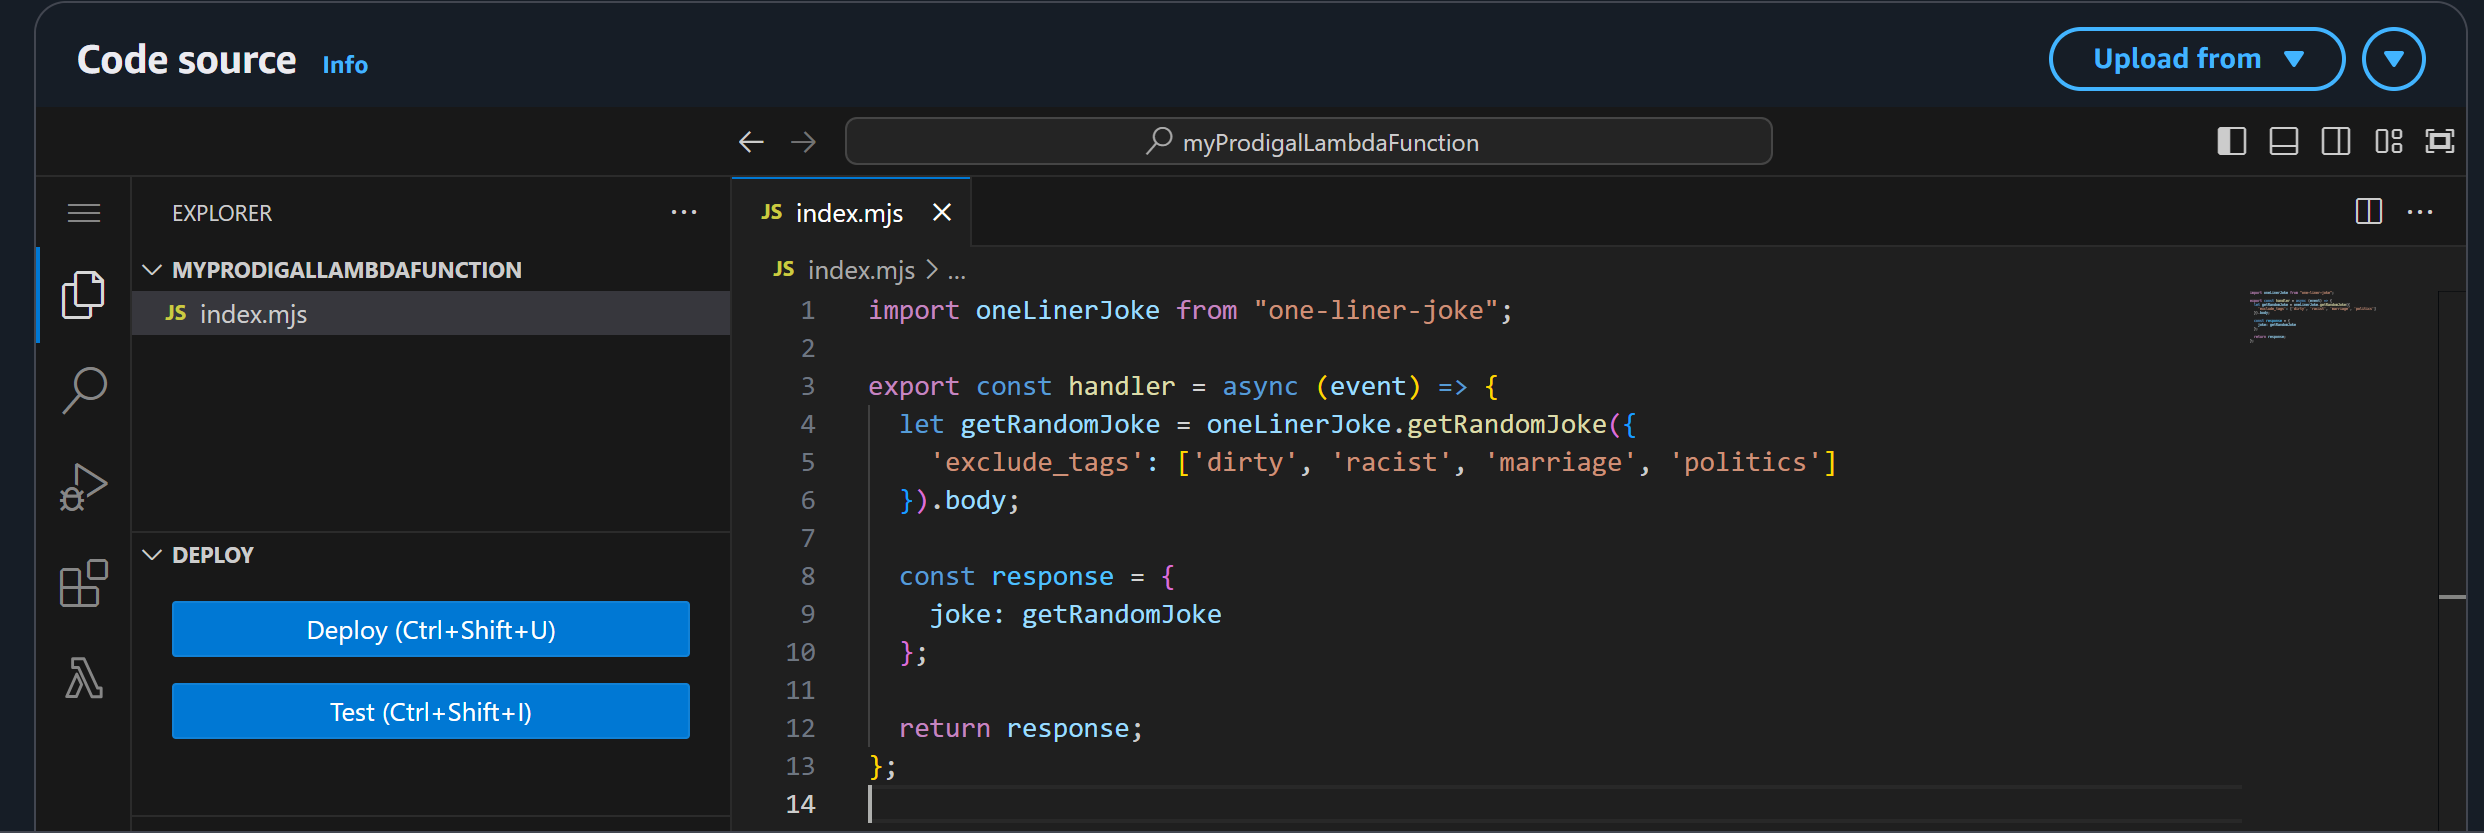
Following is the JavaScript handler file
// file name: index.mjs
import oneLinerJoke from "one-liner-joke";

export const handler = async (event) => {
  let getRandomJoke = oneLinerJoke.getRandomJoke({
    'exclude_tags': ['dirty', 'racist', 'marriage', 'politics']
  }).body;

  const response = {
    joke: getRandomJoke
  };

  return response;
};
What does the above code do?
This code relies on one-liner-joke module that you can download using the npm i one-liner-joke command in your terminal. The above code, retrives a joke and, sends it as a json object.
Following is the node folder compression
Below is how the handler function looks in the lambda code editor:
Task 5: API Gateway Setup and Integration
Subtask 1 (5.1): Creating the REST API Trigger
- Navigate to the API Gateway service in AWS.

- Create a new REST API and give it a name.

- Configure the integration to point to your Lambda function.
Select GET method and choose your lambda function’s ARN.

Deploy your API:
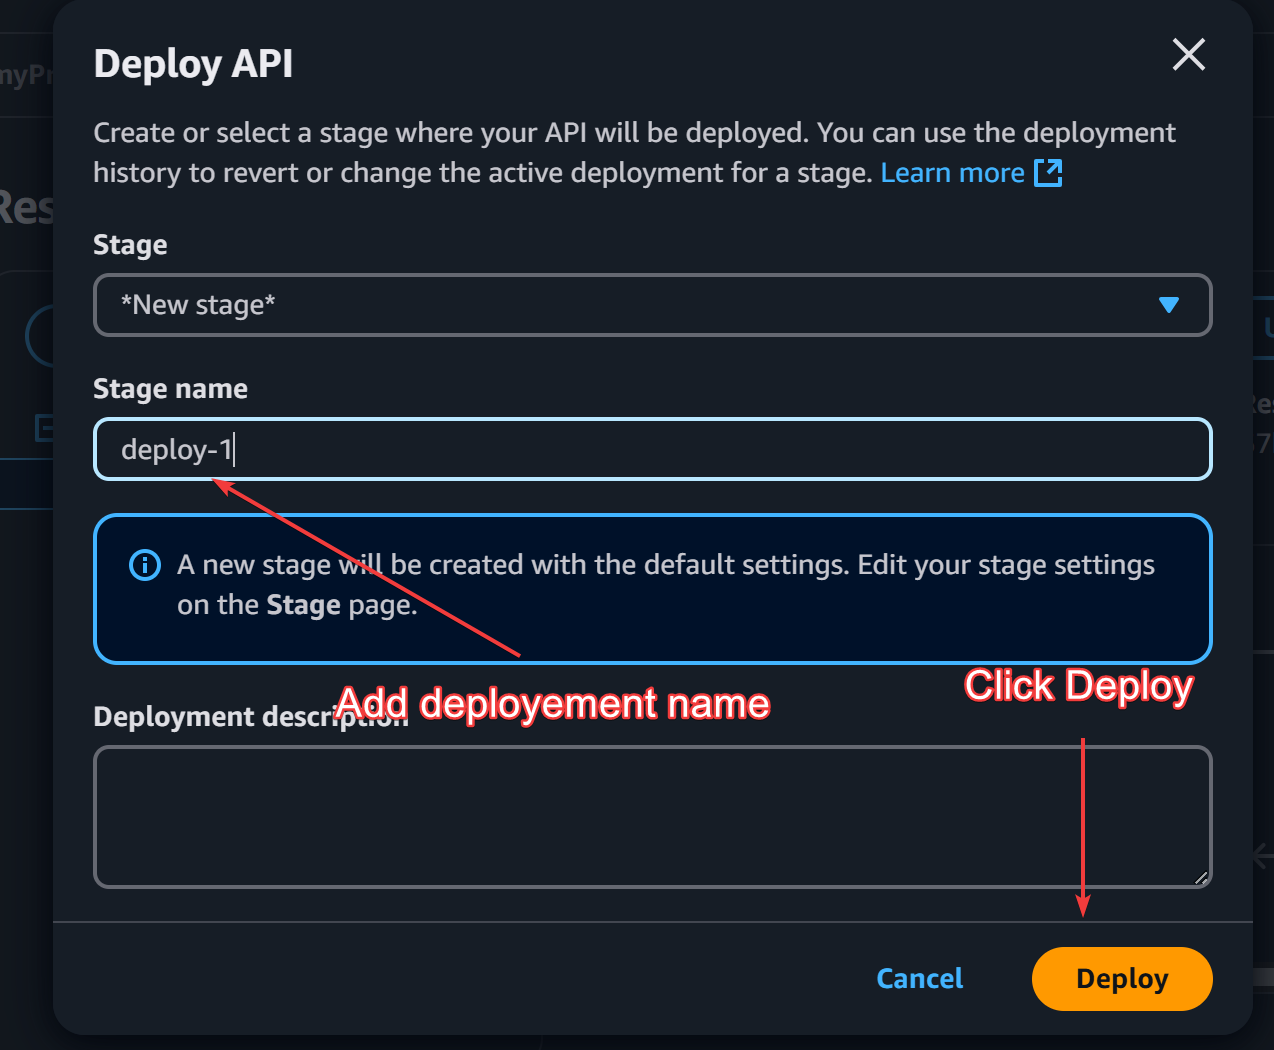
We can now check this API through postman.

Subtask 2 (5.2): IAM Access and Open Key Variants
- IAM-based access: Configure resource policies and usage plans.
To enable IAM based access do the following:
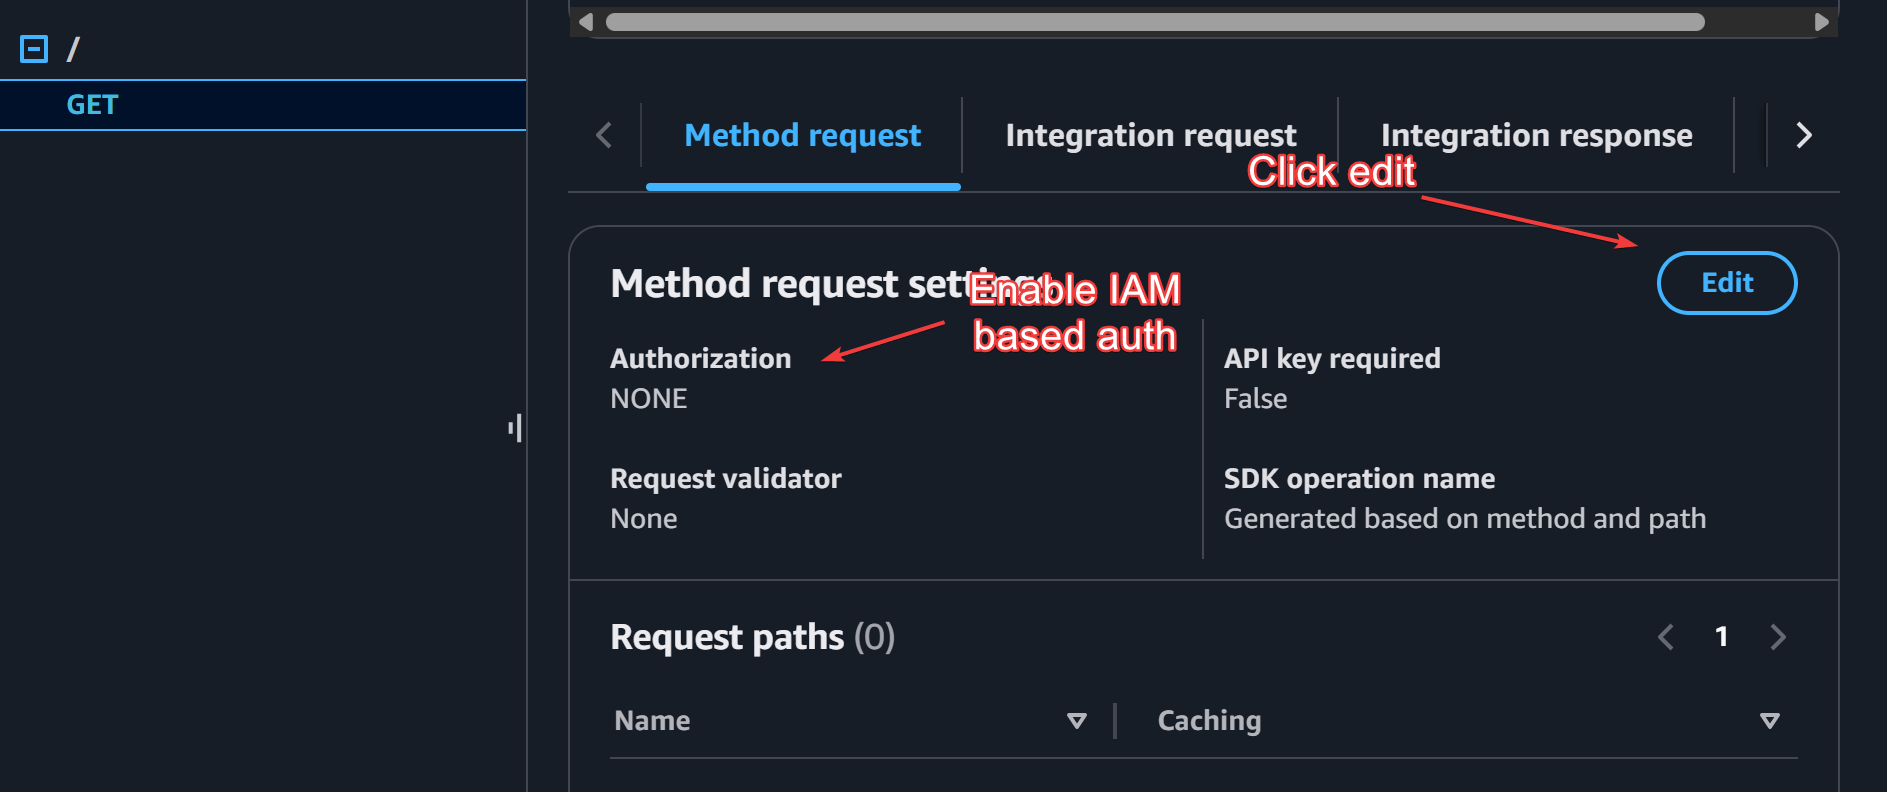
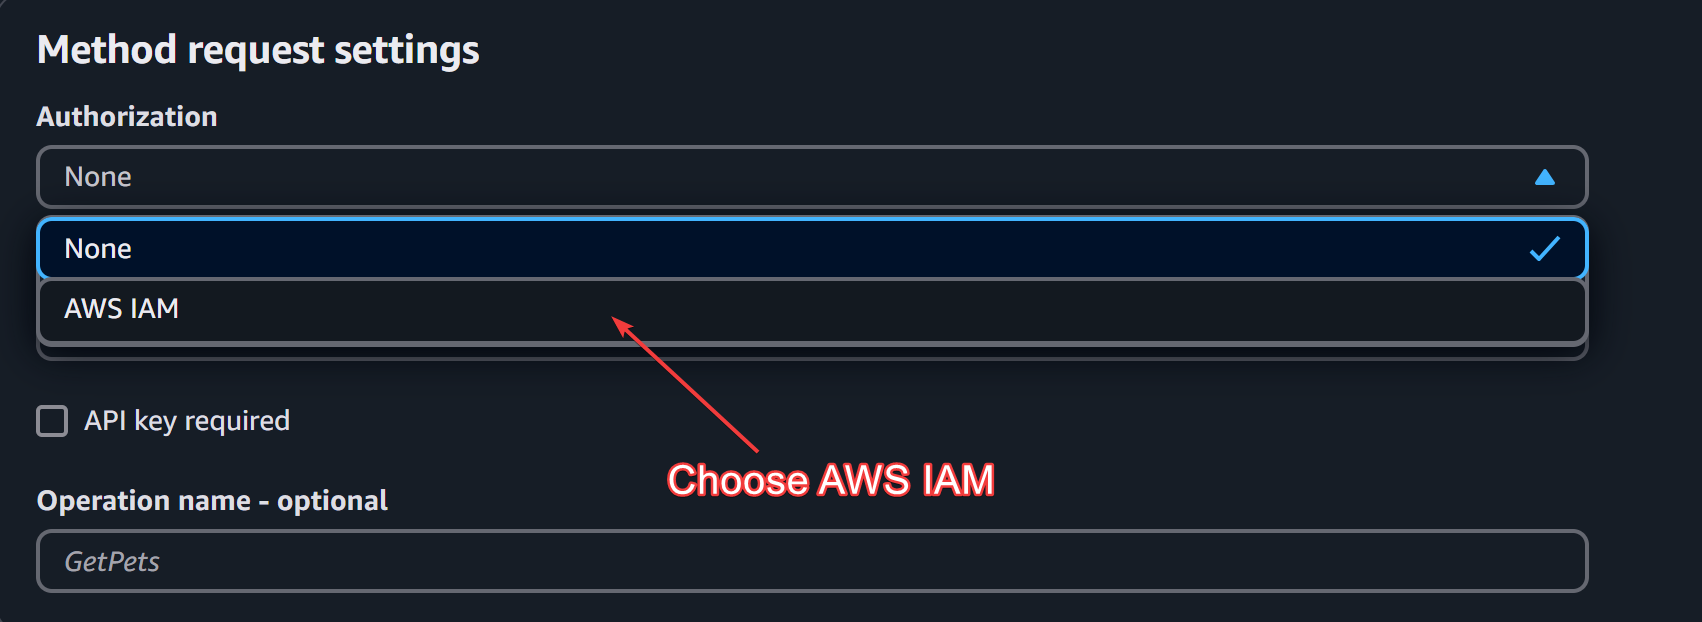
Click AWS IAM and hit save.
Quick question. What does setting authorization to AWS_IAM do?
This means that every request that will pass through the API gateway service will need to be authorized. Hence, we need to sign our requests so that API gateway service can check wheteher the incoming requests are truely ours or of some malicious user.
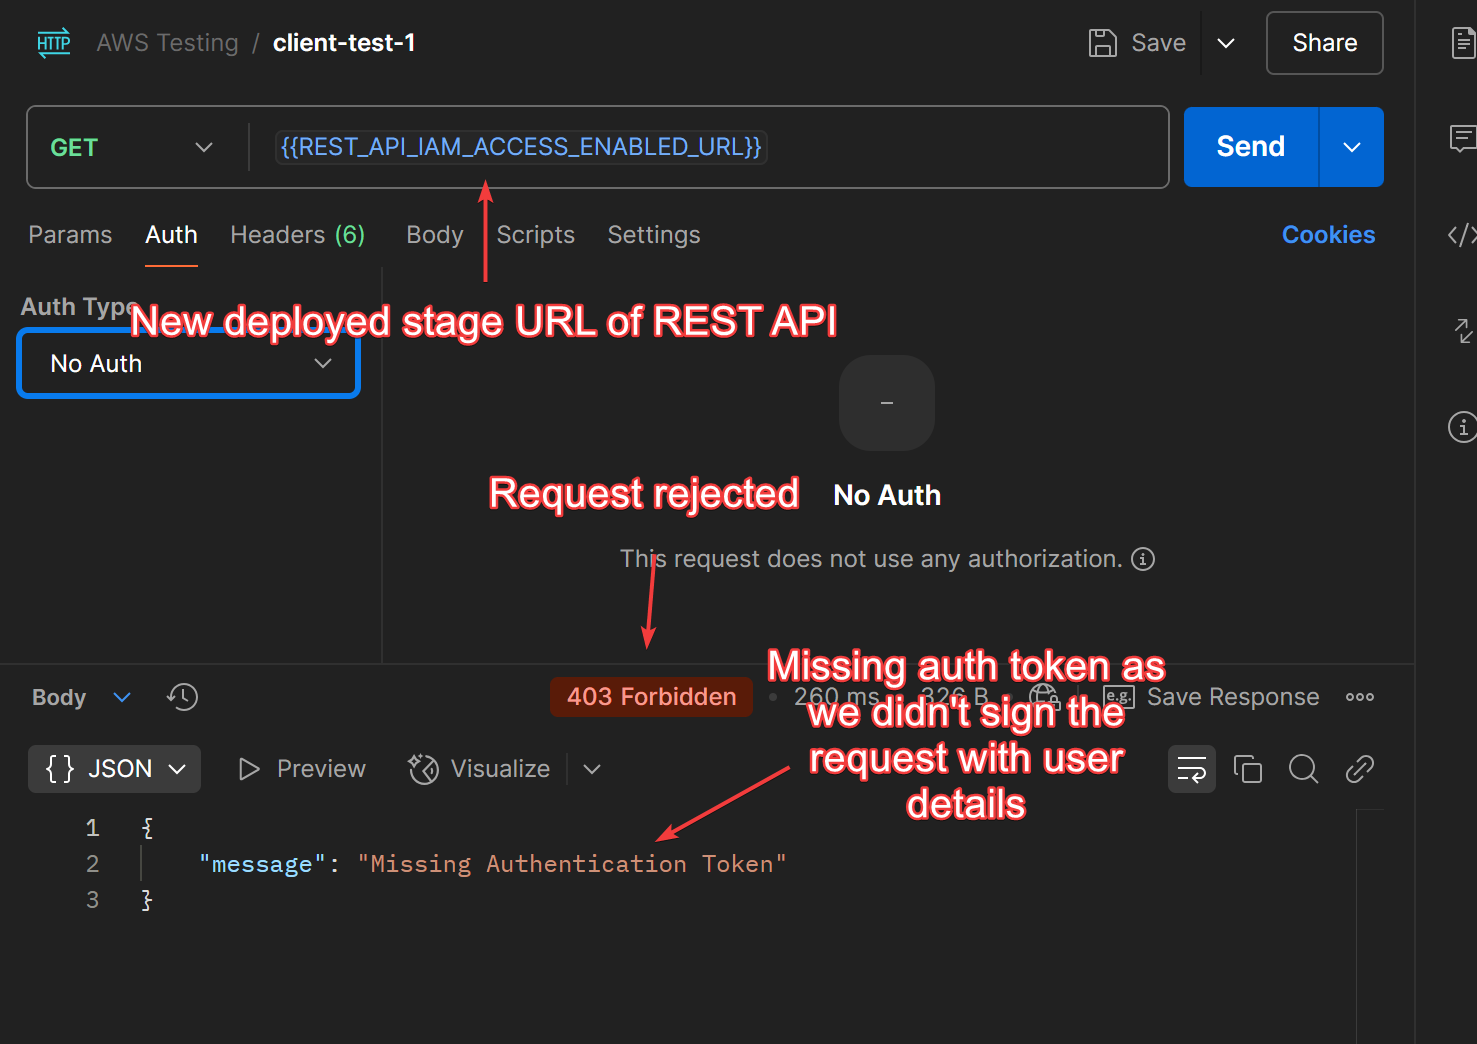
Re-deploy your project. Here, I have re-deployed as deploy-1-AWS_IAM-Enabled .

Now, upon pinging the newly deployed URL, we will get a Missing Authentication Token error as we didn’t sign our request with user details.
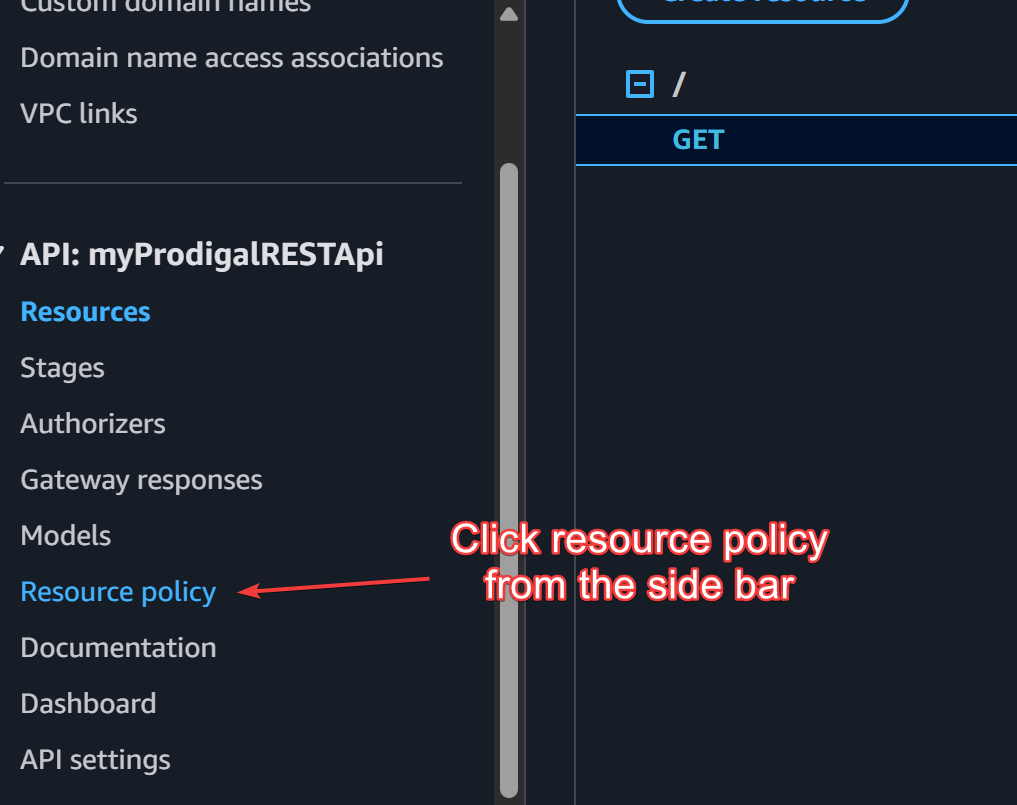
To configure resource policy, click on resource policy, then click create policy.
Choose AWS account allow list template to fill:

The filled policy document will look something like:
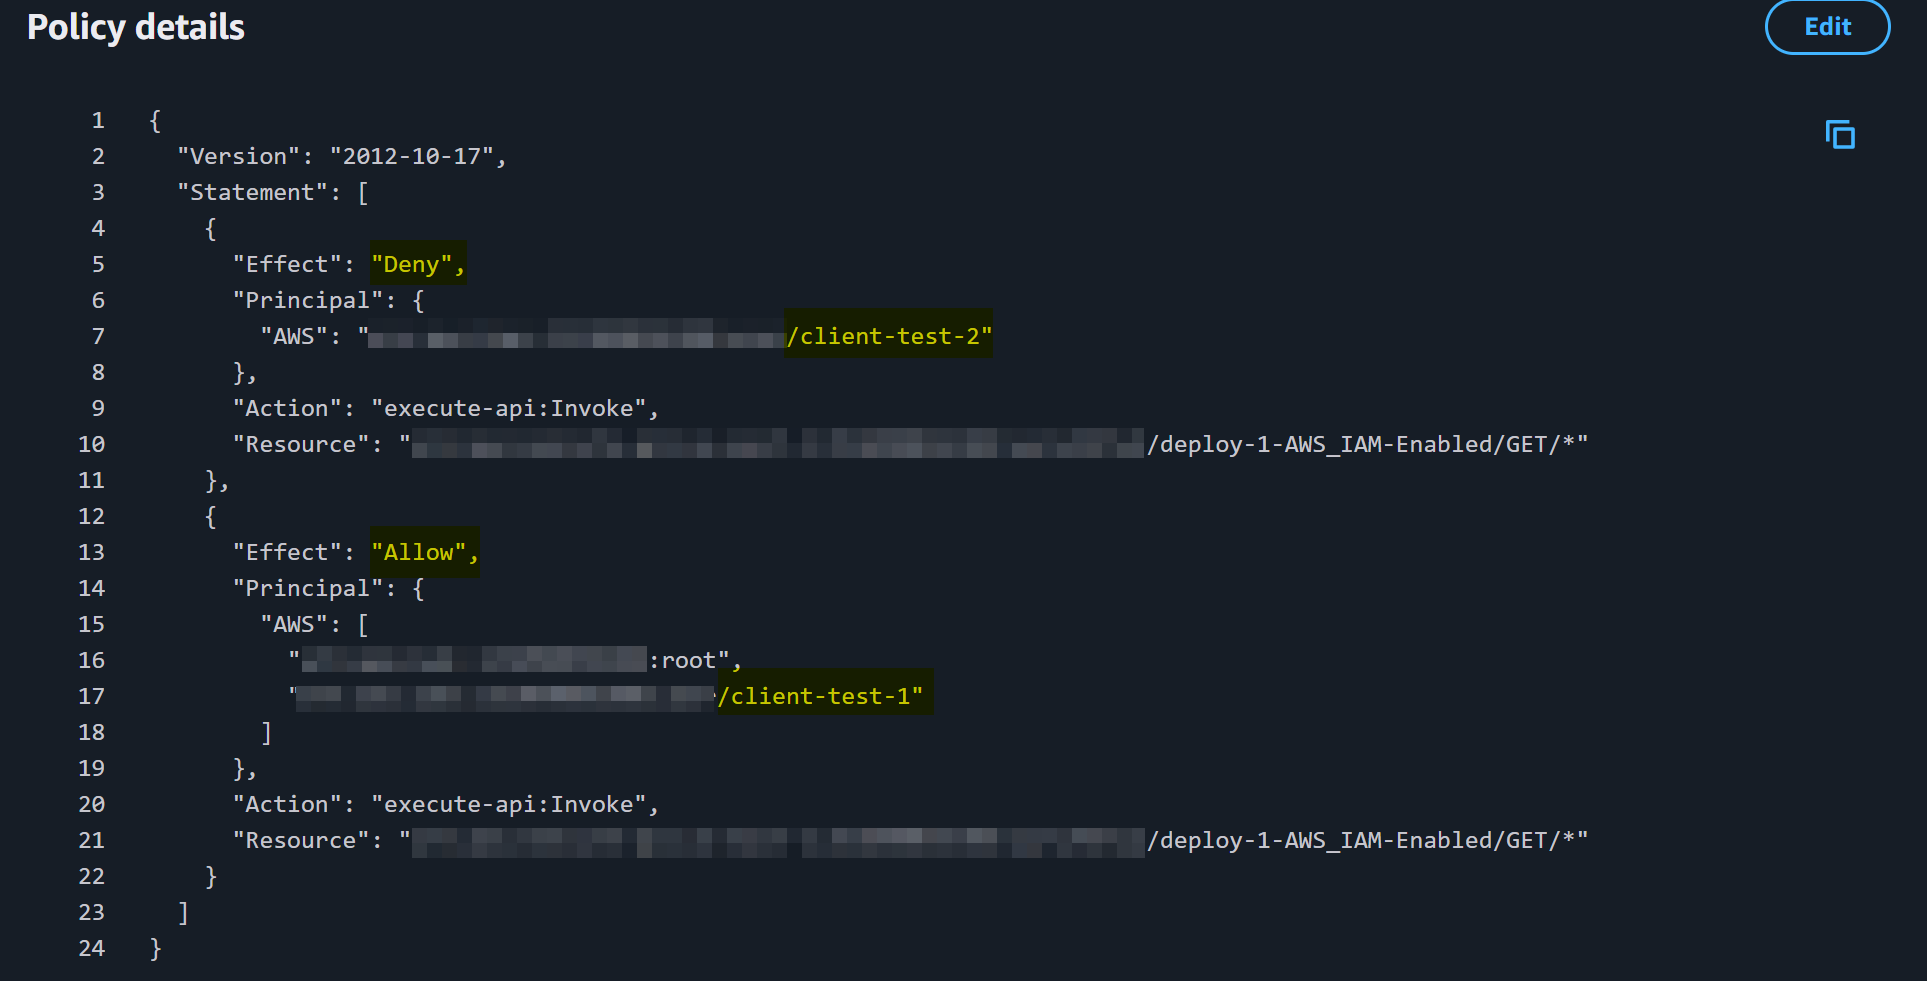
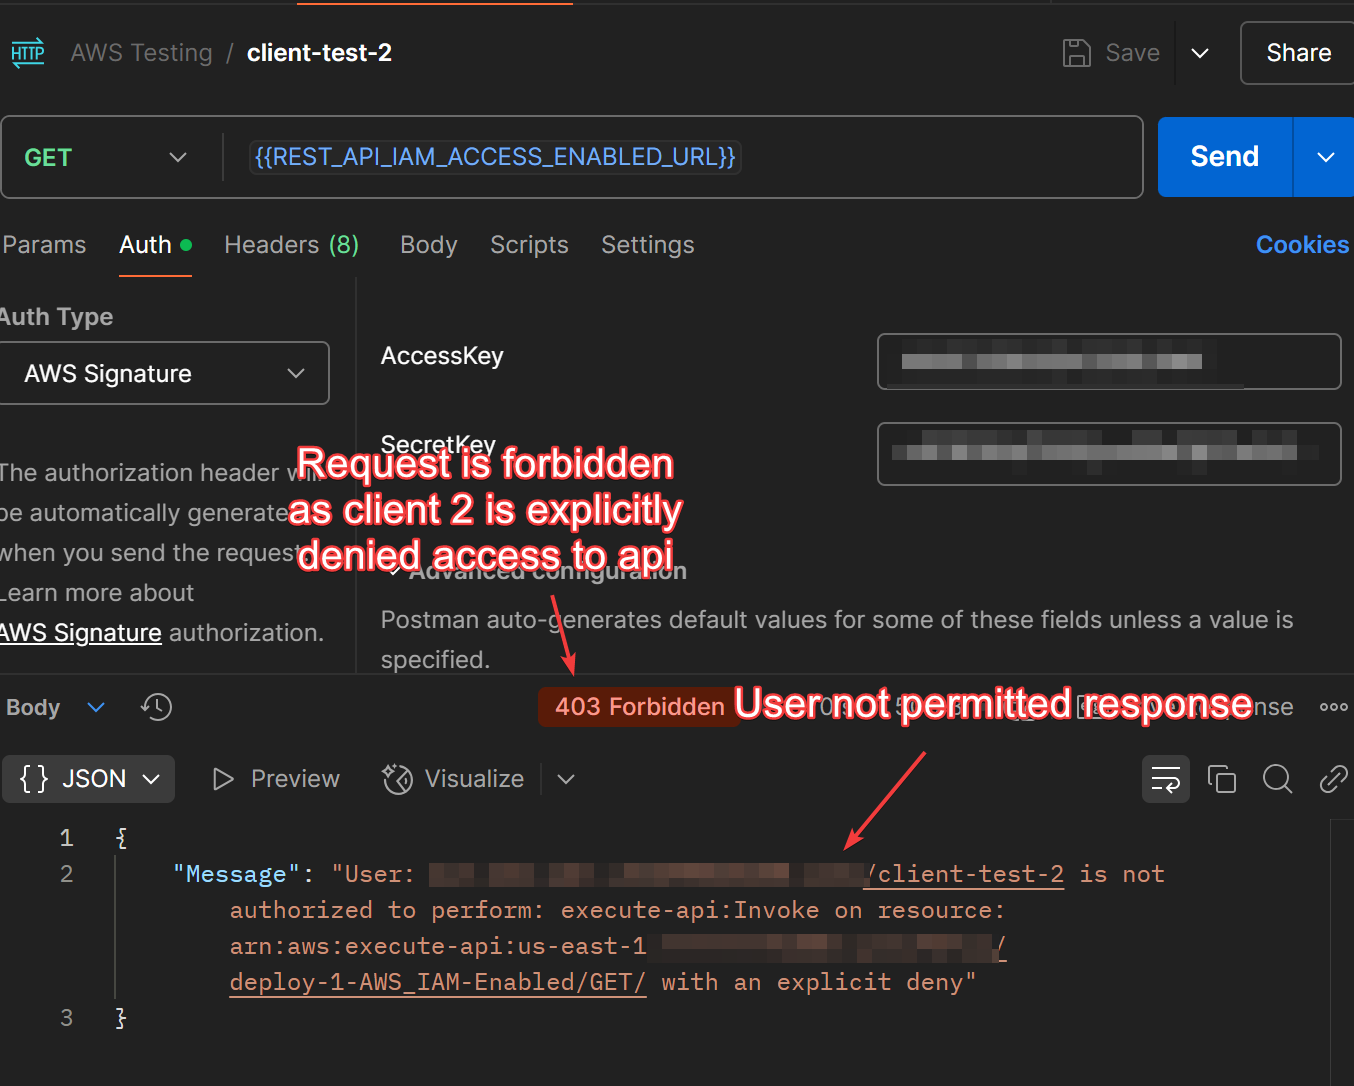
Note that we have created two IAM users client-test-1 (this user will be granted access to trigger the REST API) and client-test-2 (this user will not be allowed to trigger the REST API). We will use the access keys and secret keys generated by these users to sign their requests.
To learn about how to create IAM users on AWS with custom permissions, refer this and this.
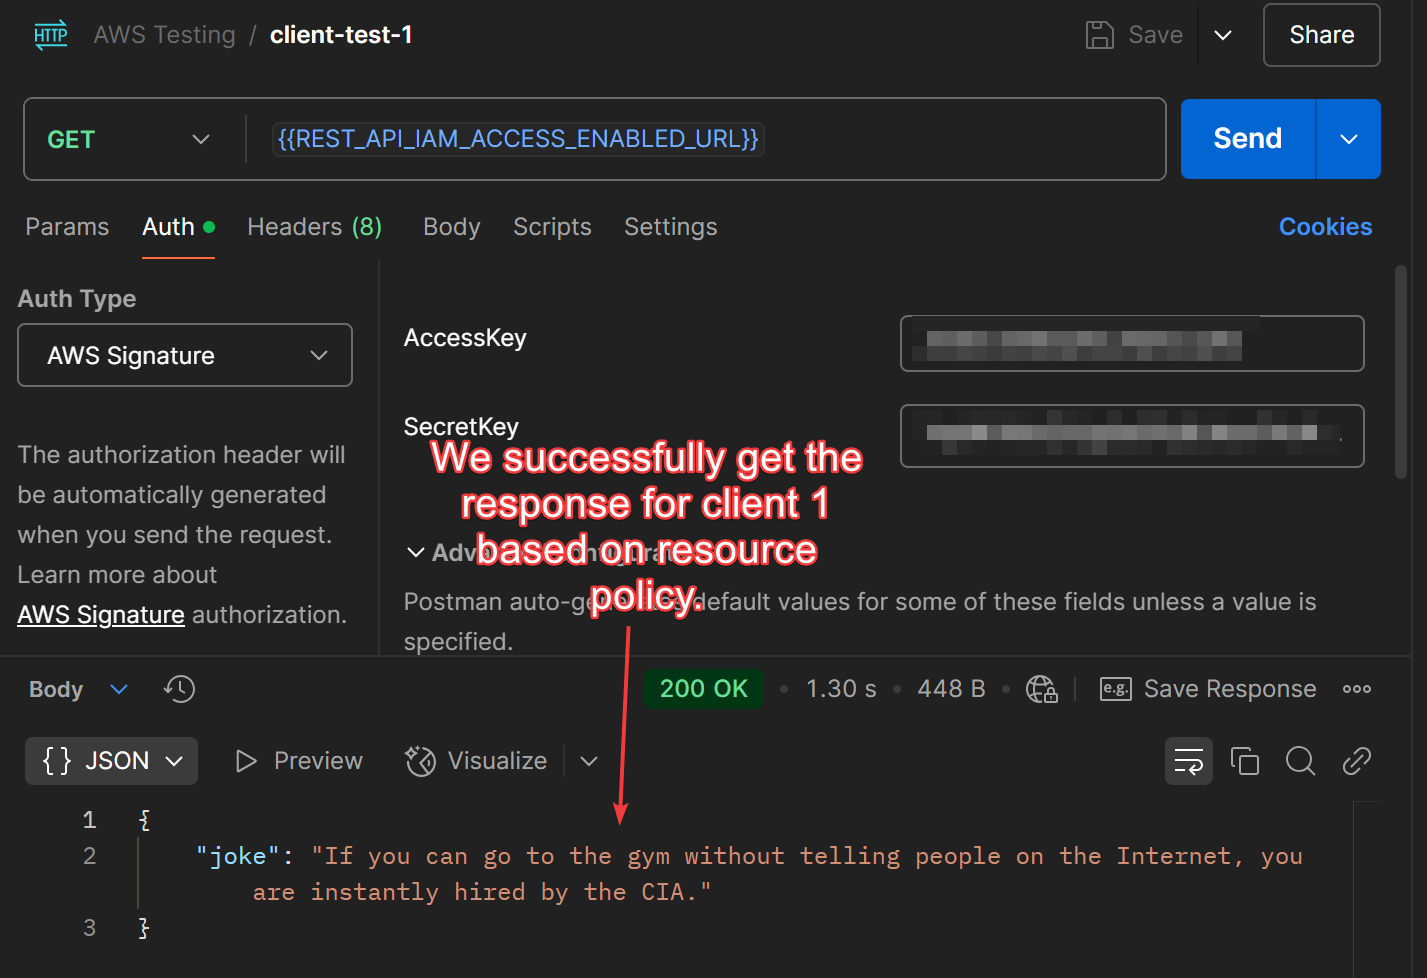
Once, all of this is set up, we can test the APIs. Below are results for both the clients:
Client-test-1
Client-test-2
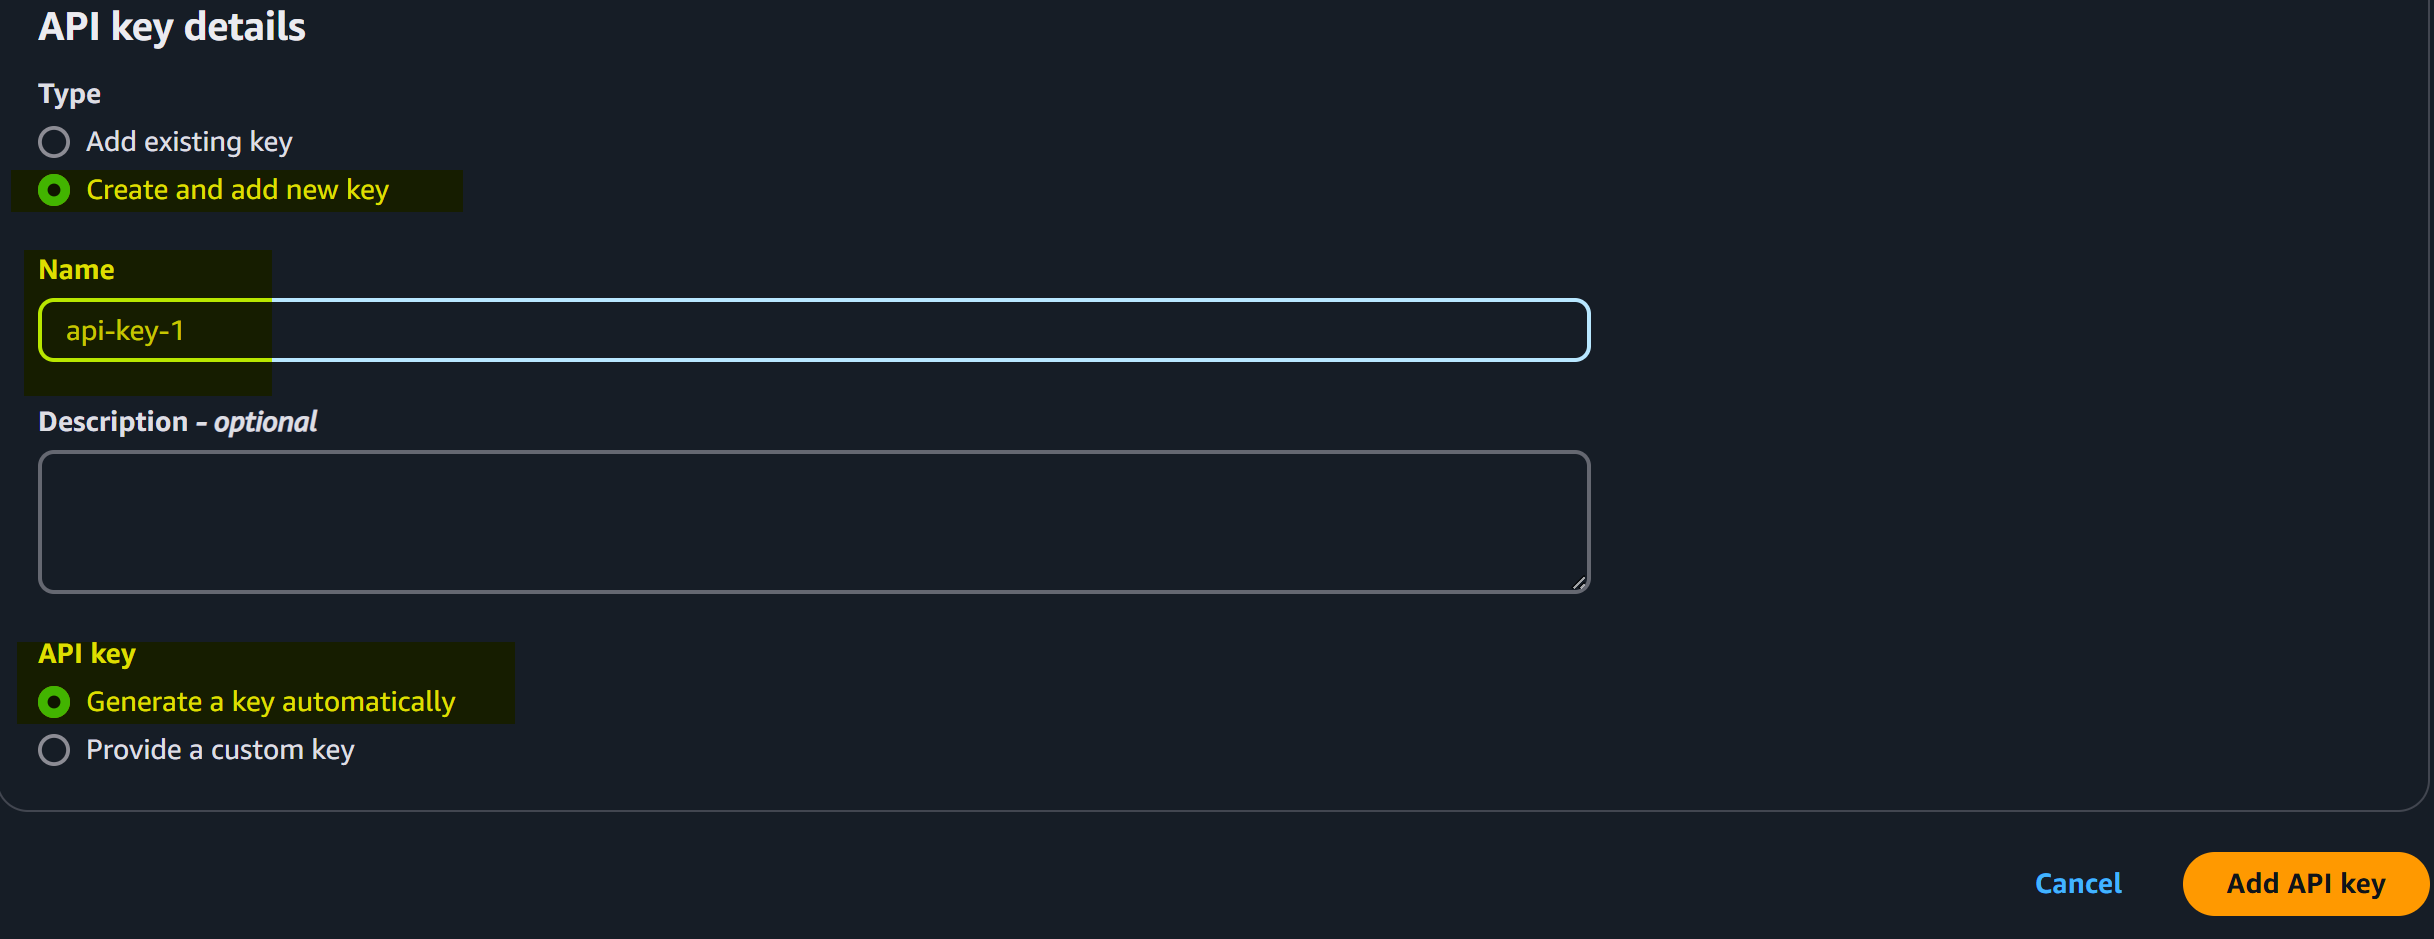
- Open API (API Key): Enable API key requirement and show how to create and attach the key.
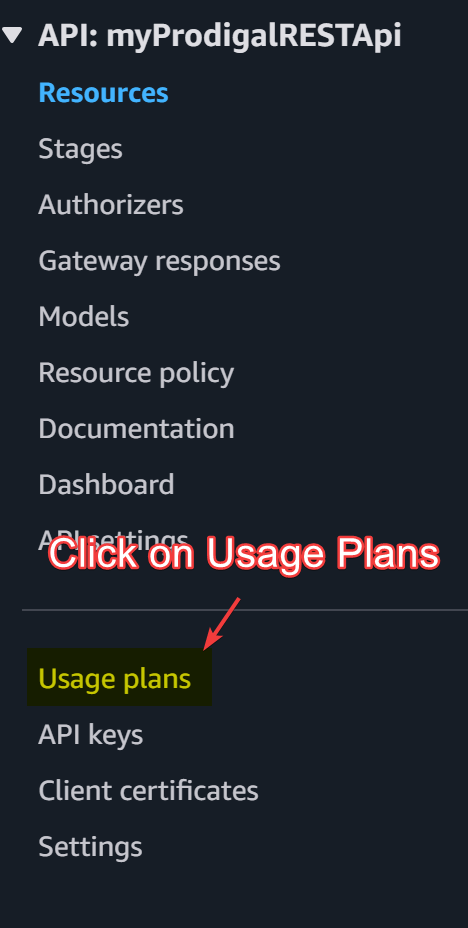
Open the side-bar and click on usage plans then, create “Create usage plan”.
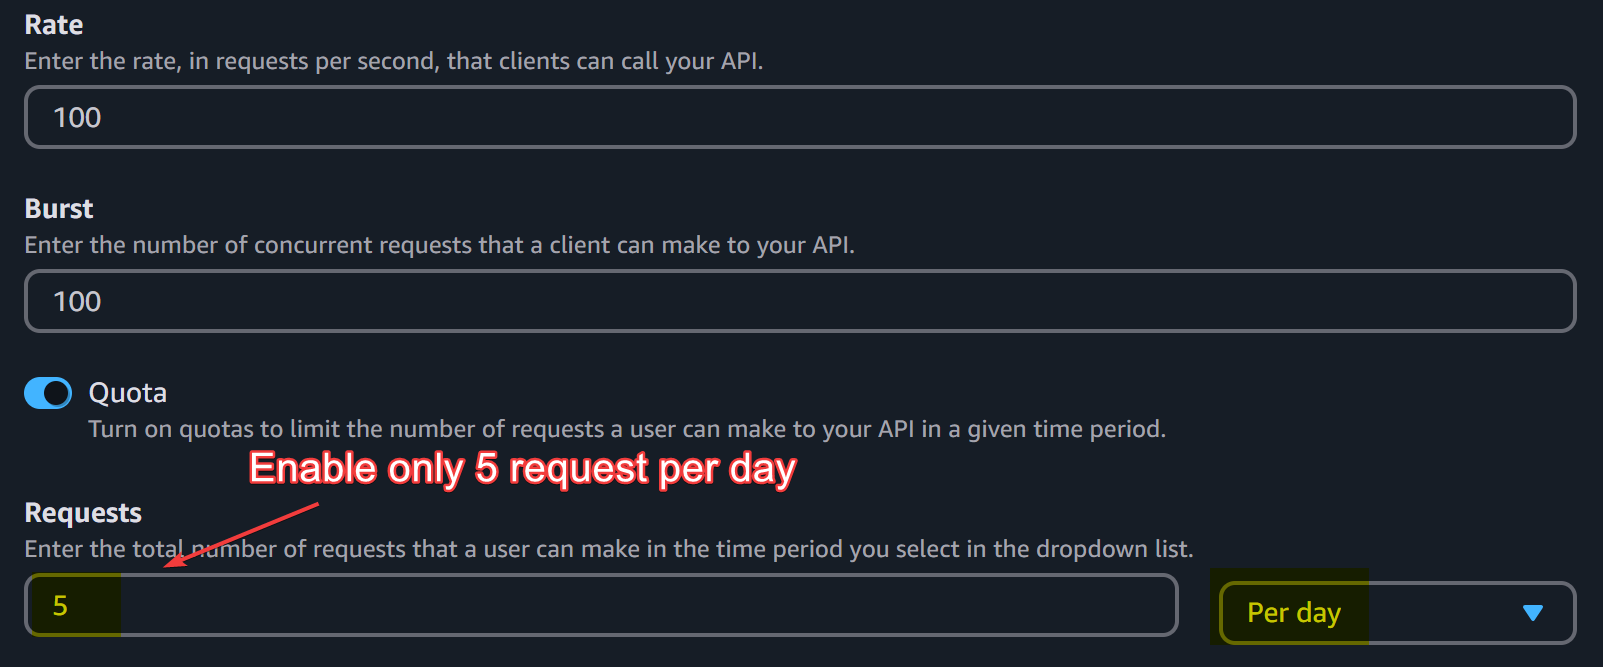
Here, we are only enabling 5 requests per day as we want to demonstrate the effect of user plan. In real world scenario, the number will be decided by what the service is and how much load it bears on average.
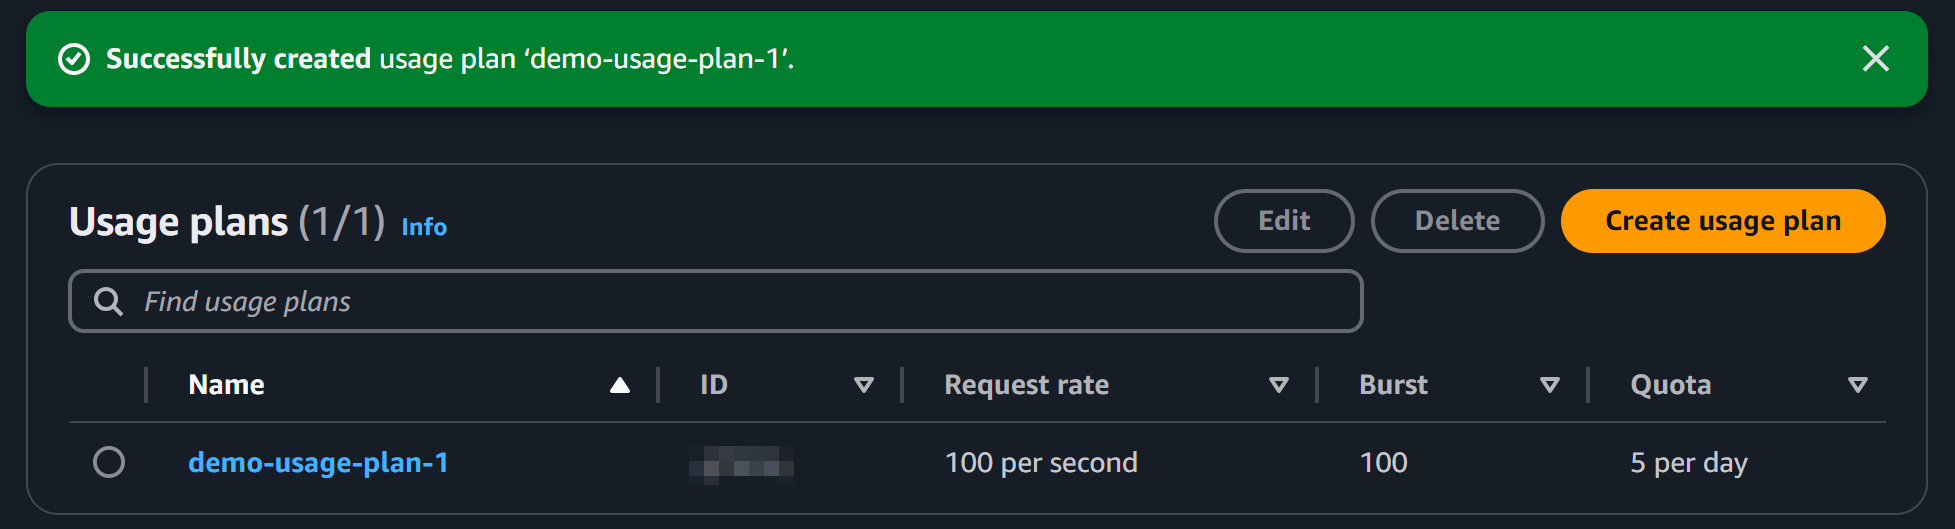
Hit the create usage plan button.
It will look like this:
Click on that usage plan and scroll down. We will now link our deployed API to this usage plan.
Click on Add API stage.
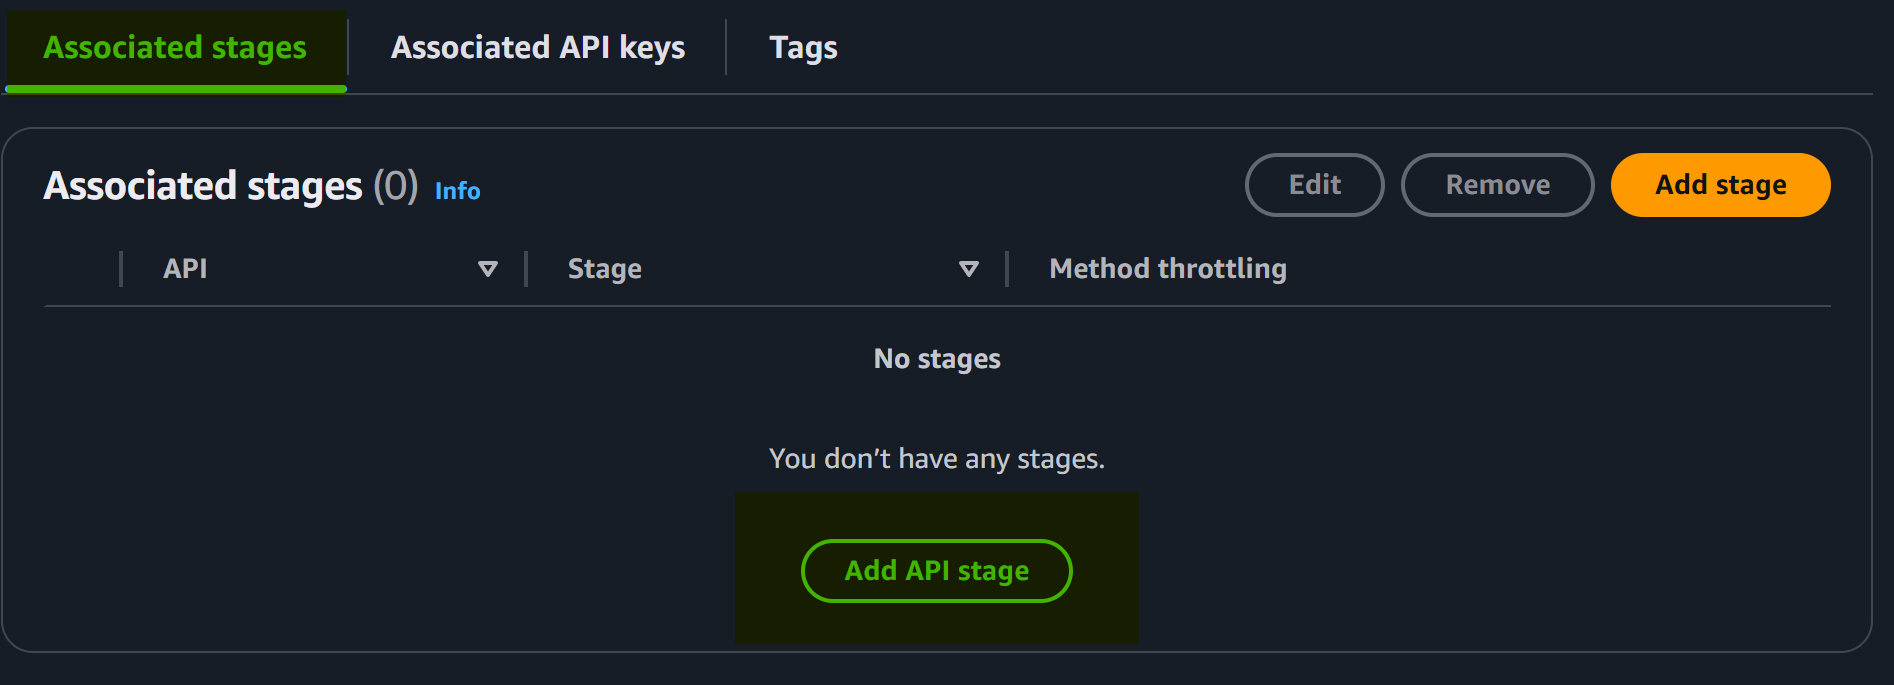
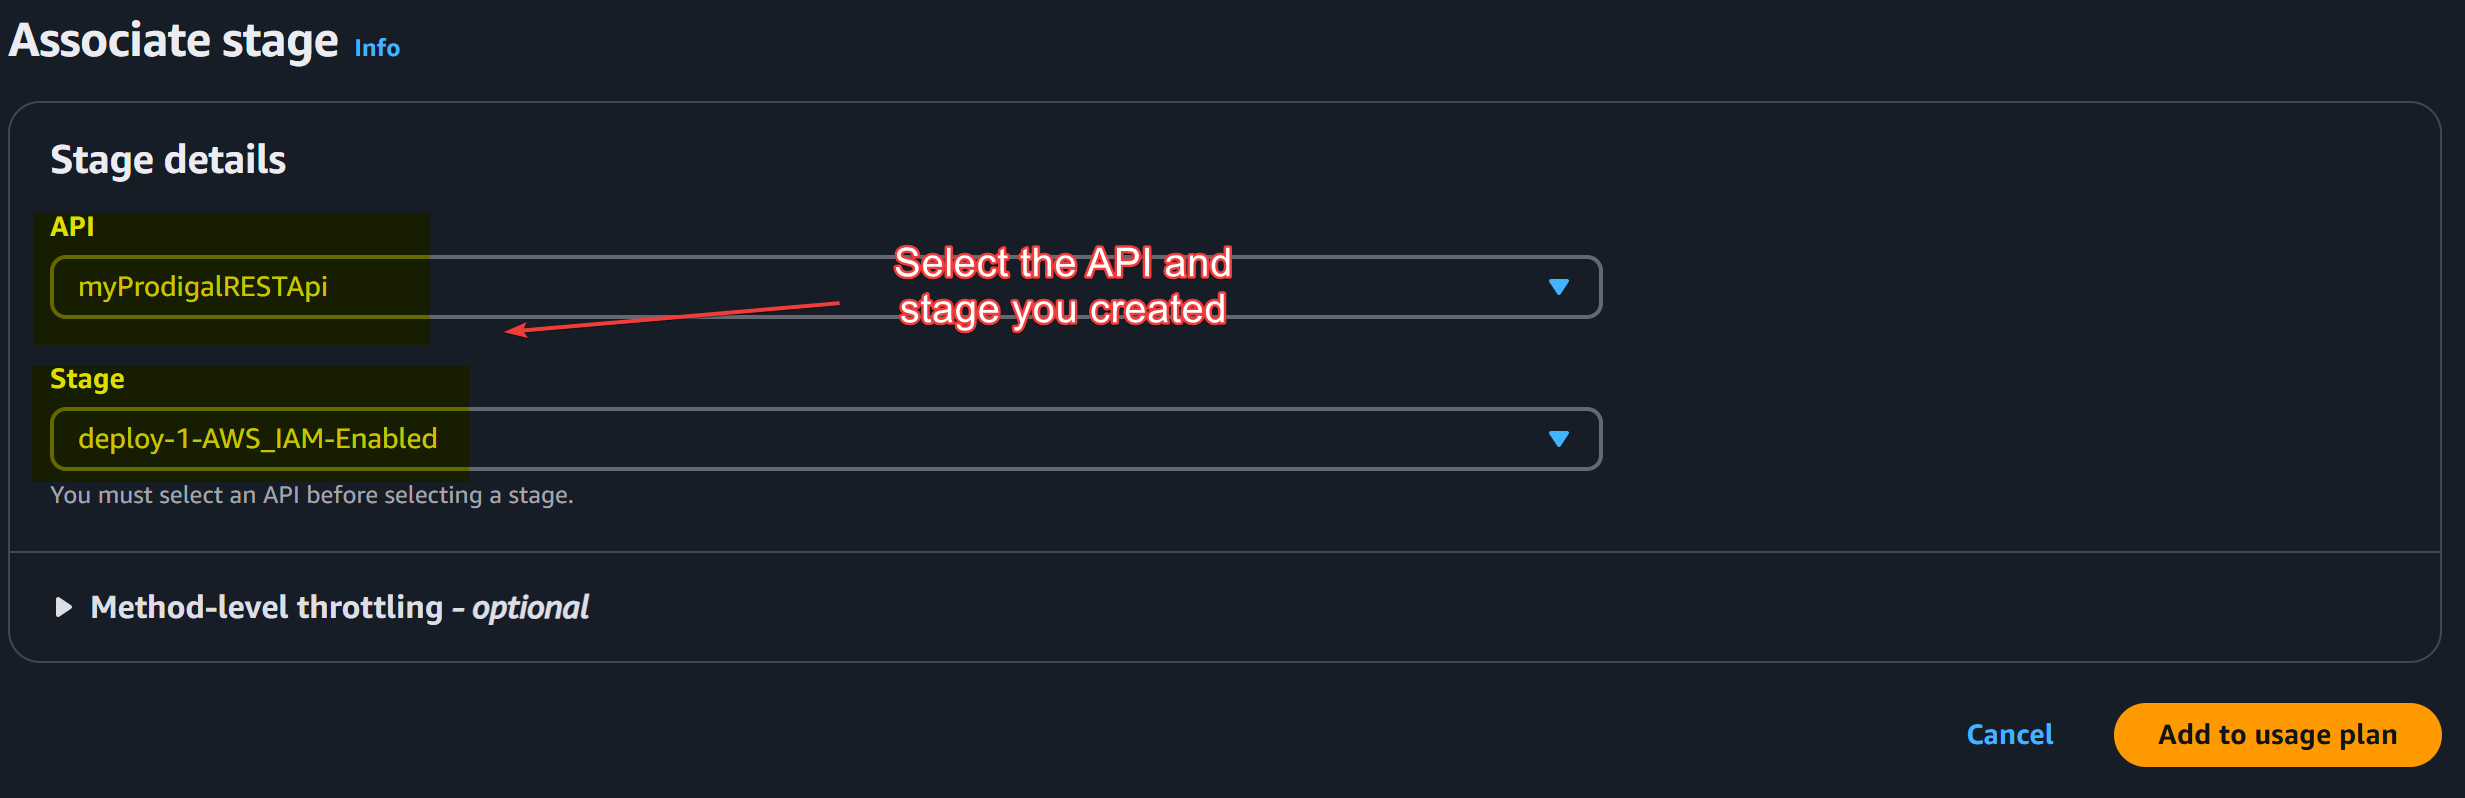
Select the API and stage, then click “Add to usage plan”.
By now your usage plan would be setup. Now, we need to setup API keys.
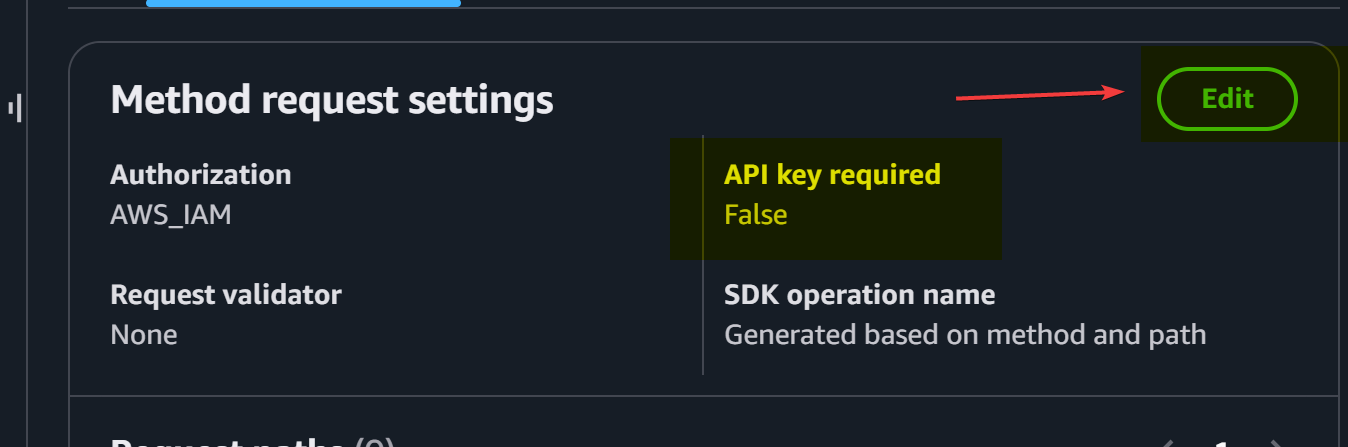
For that go to the main page and click “Edit” again and enable API key required field.
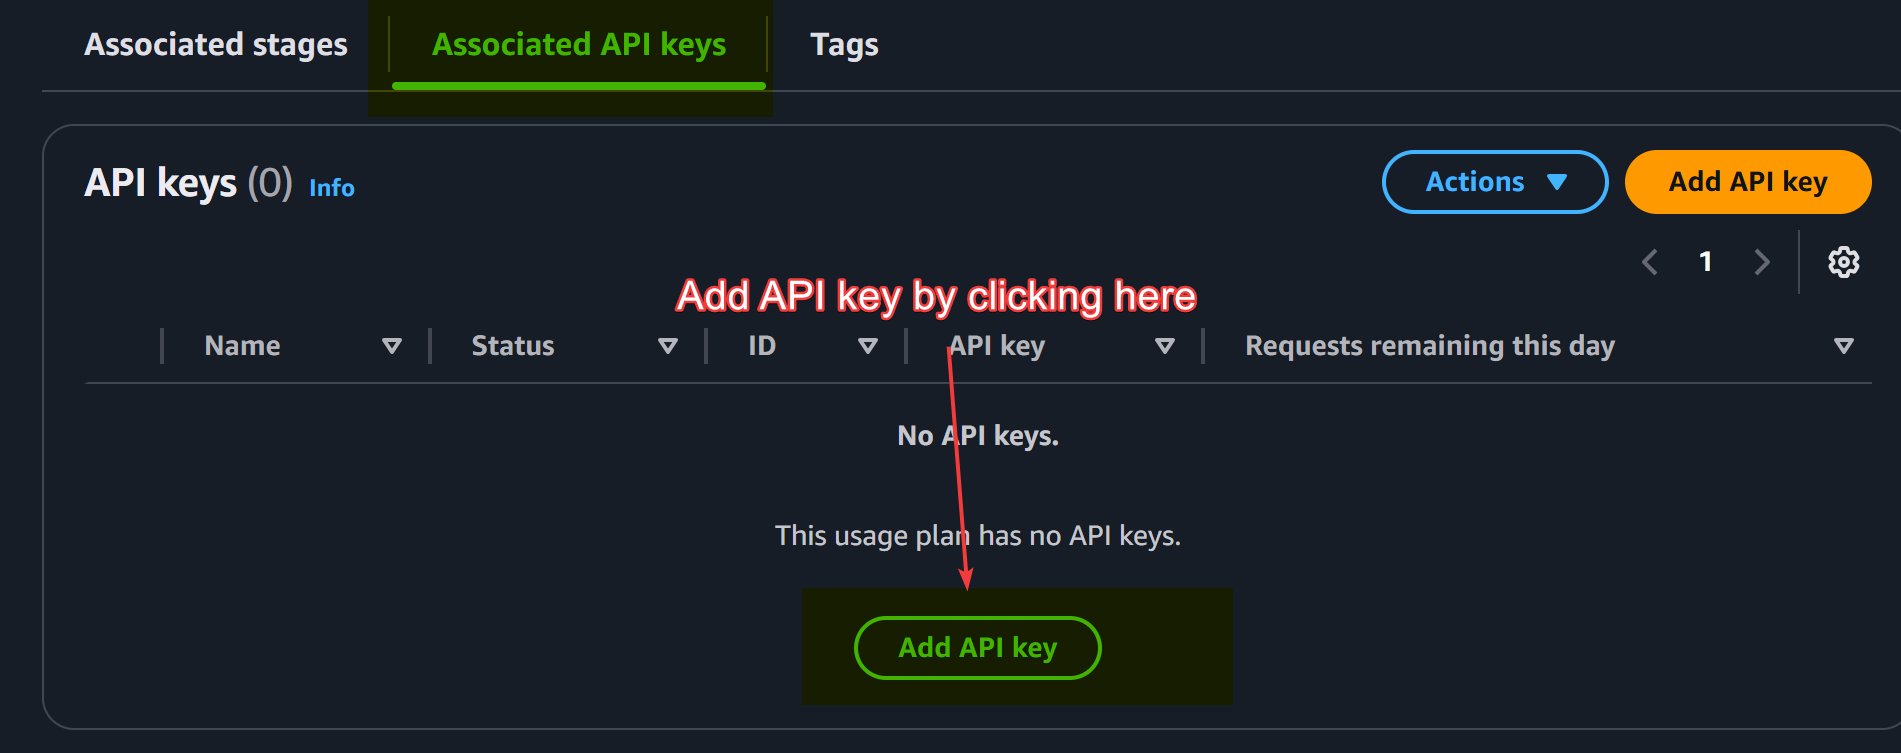
Come back to usage plan dashboard and select “Associated API keys” and click on “Add API key” and follow the instructions.
Fill the details and click Add API Key as shown below:
Below are the metrics that will be displayed for your api key.
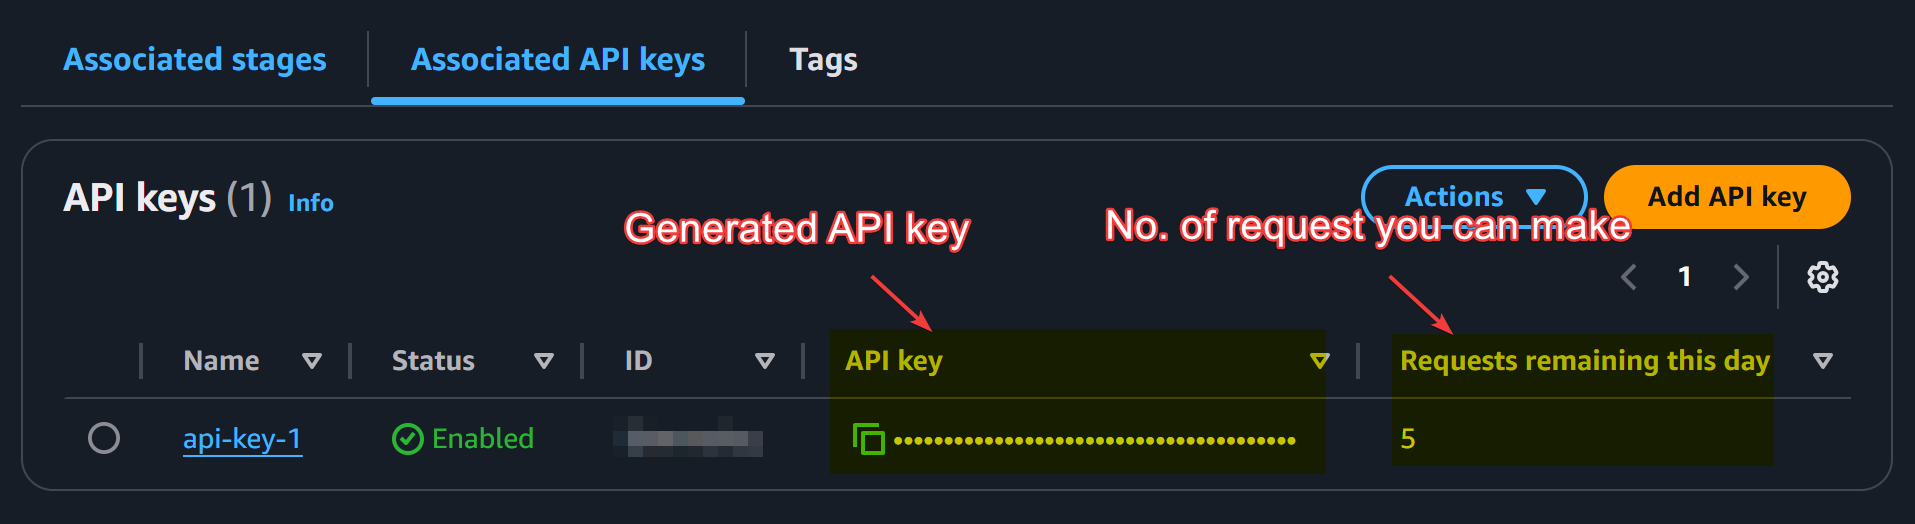
Redeploy the project and make 6 postman calls to this API through client-test-1 user. Note that you have to mention the generate API key (above) in the request you are sending as x-api-key . This is shown in the image below:

Now, for the next step, we will make 6 consecutive requests to this API.
The following is the result:

As we had configured our API to take only 5 requests but, we sent 6 requests, it blocked our last request with a status code 429: Too many Requests .
This can be cross-checked in the API dashboard:
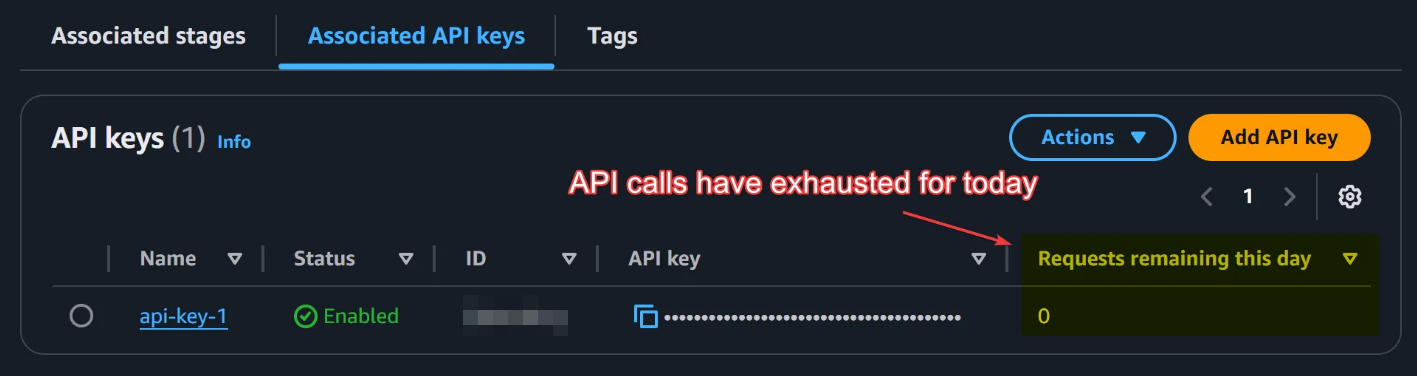
The dashboard gets updated and, the remaining requests for the day is displayed.
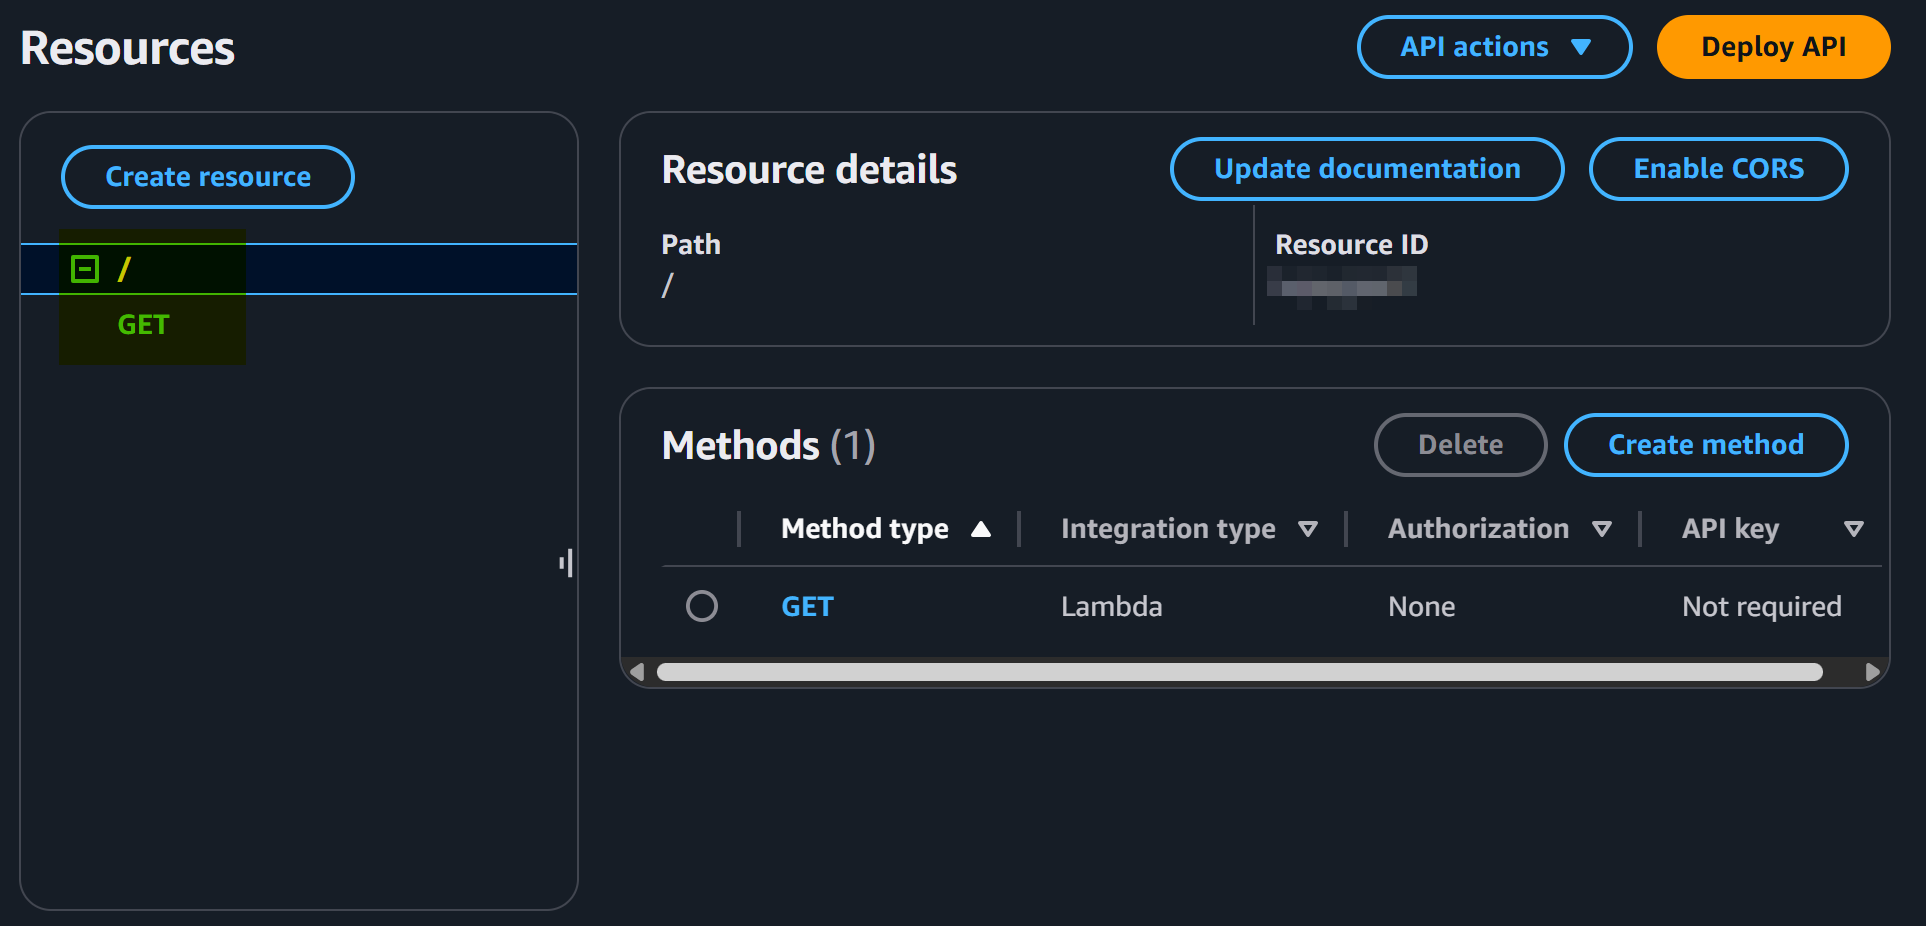
Subtask 3 (5.3): CORS Management and Stage Redeployment
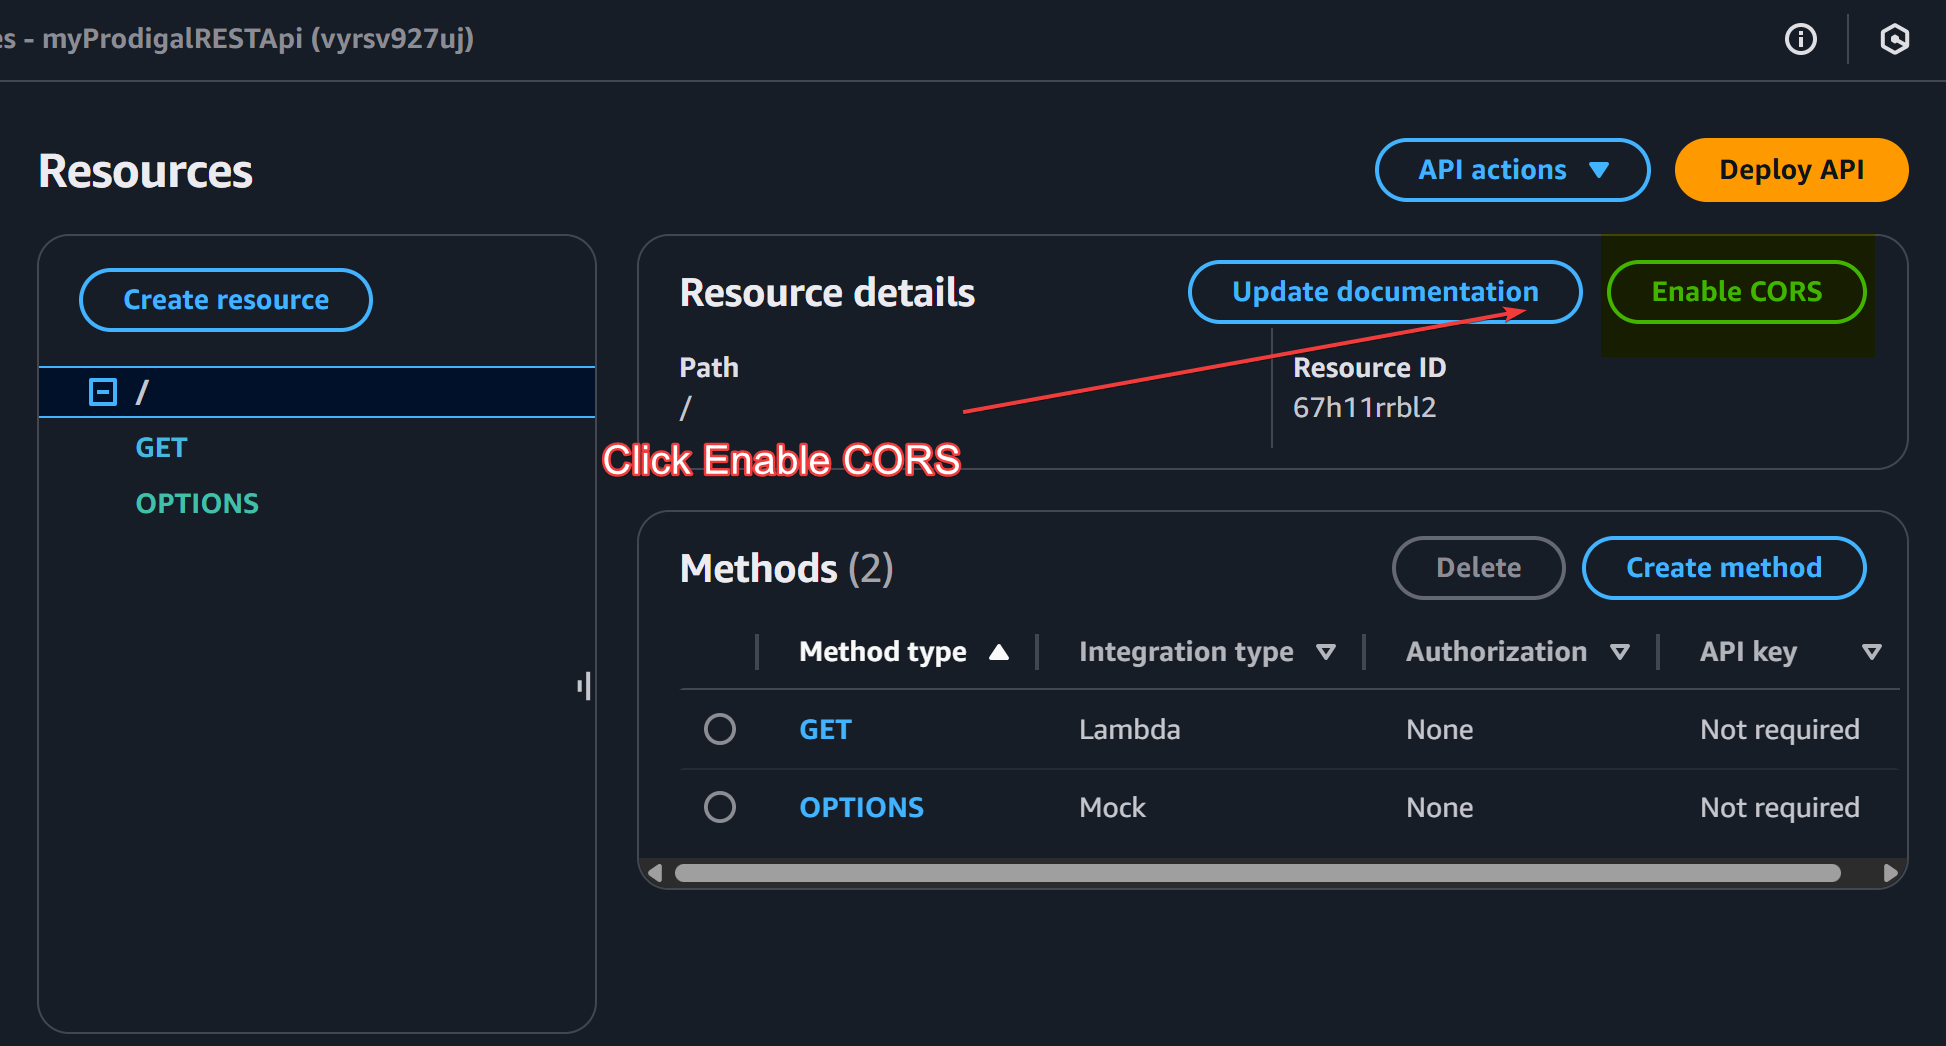
- Enable and configure CORS on the API Gateway
For this stage, we will create a REST API in the AWS API Gateway service and, link it to the previously created lambda function.
Now, we will execute the following steps:
- Navigate to the API dashboard and click Enable CORS.
-
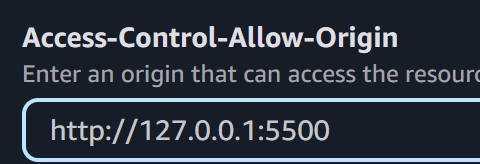
Now write the URL
http://127.0.0.1:5500underAccess-Control-Allow-Origin. This is used to store information about the URL from which we are going to call the API.Hit save button.
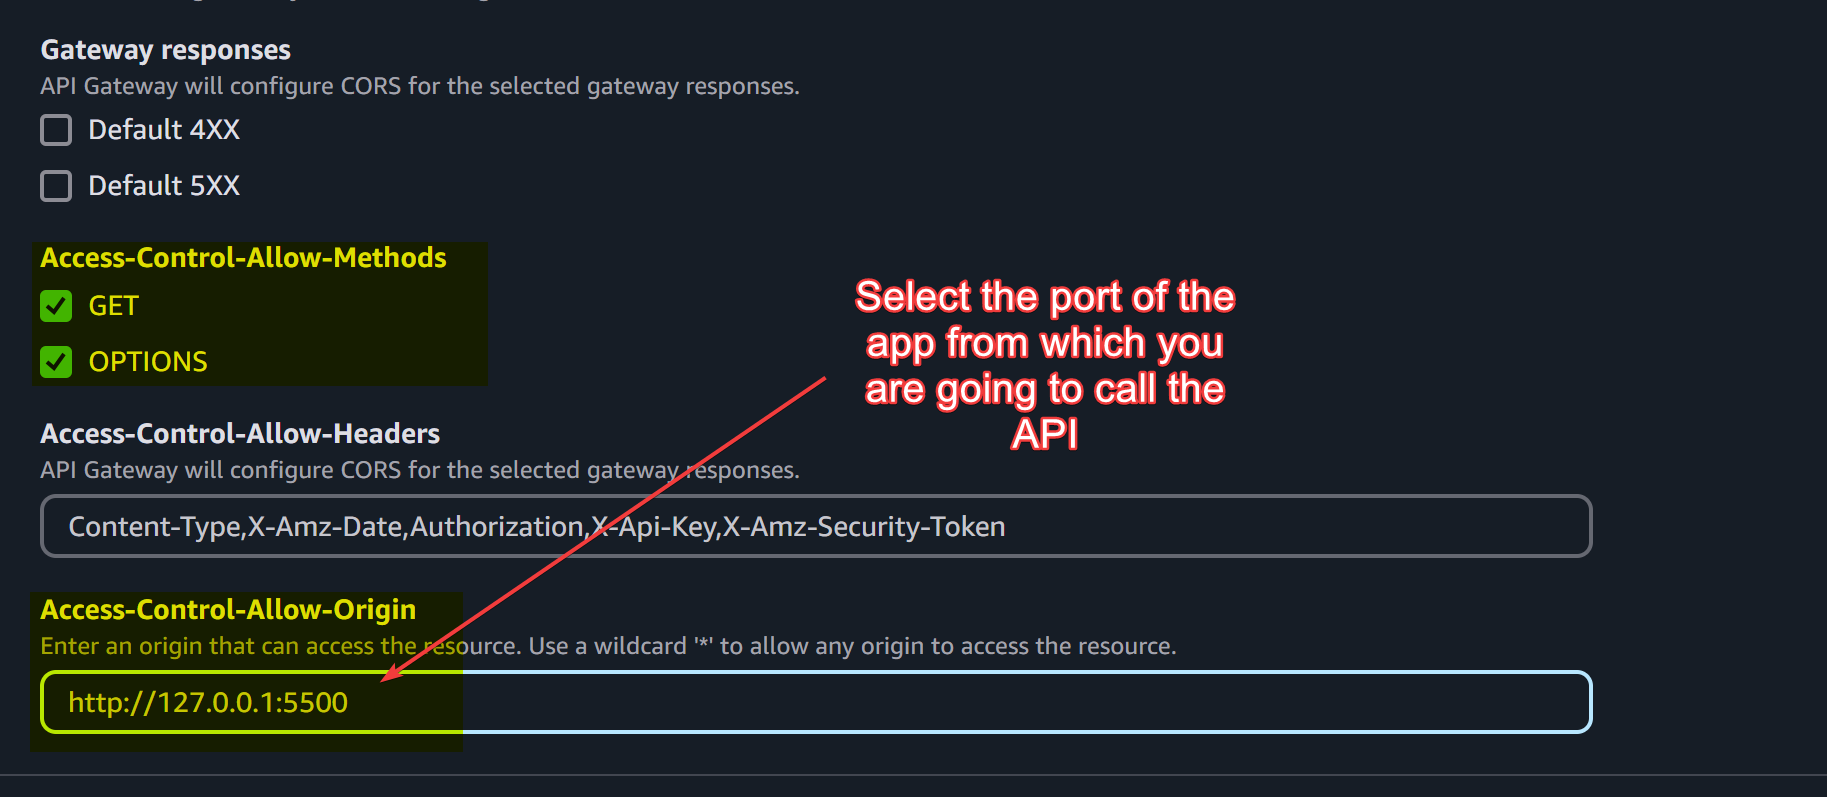
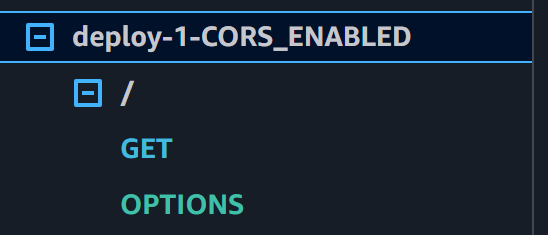
- Deploy the API and it should look something like this:
There is an OPTIONS method too. This is used in the pre-flight request handling where the one domain sends a http request to a second domain asking whether it has permission to access data from it or not.
I have disabled any IAM Access check or resource policy or demonstration purposes.
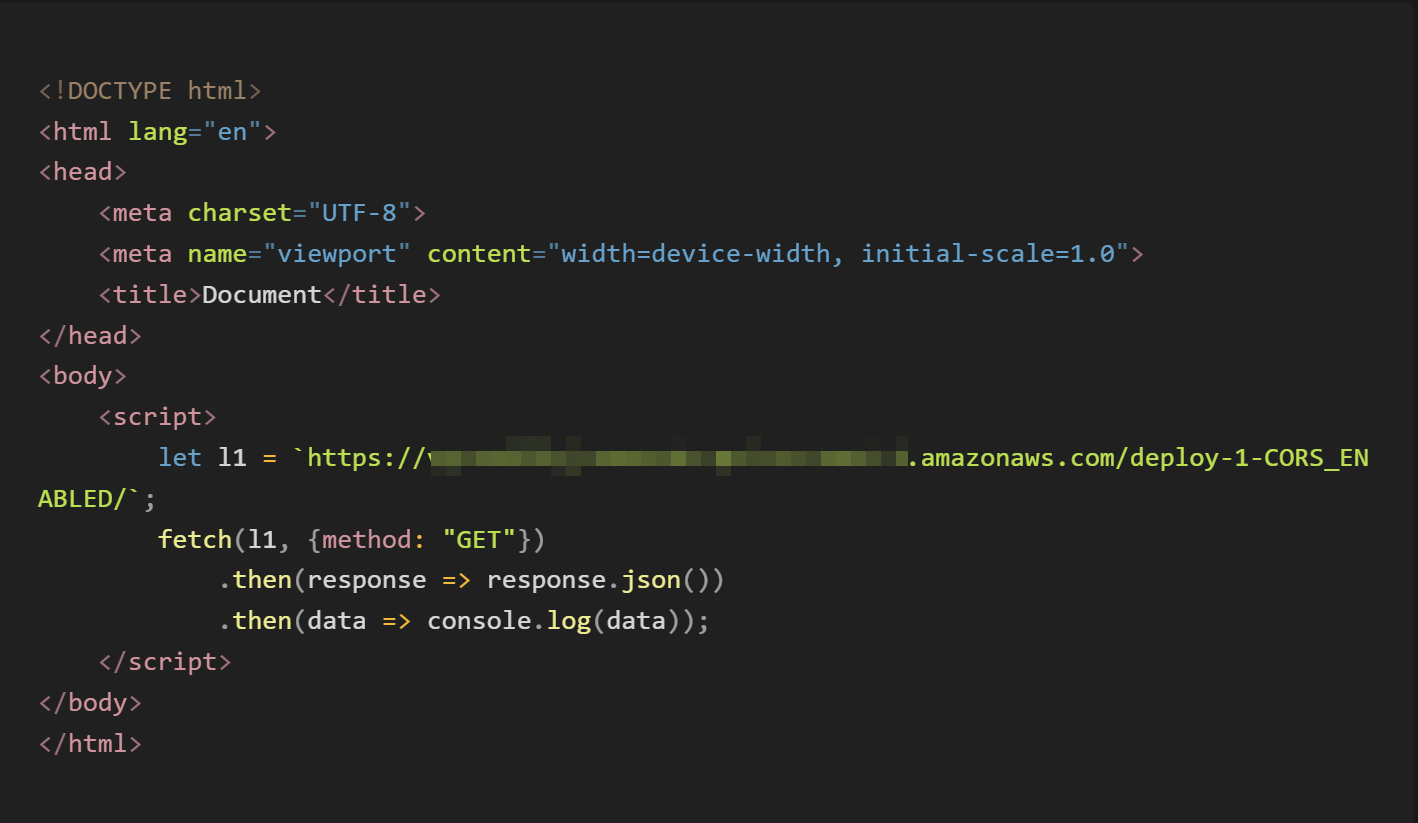
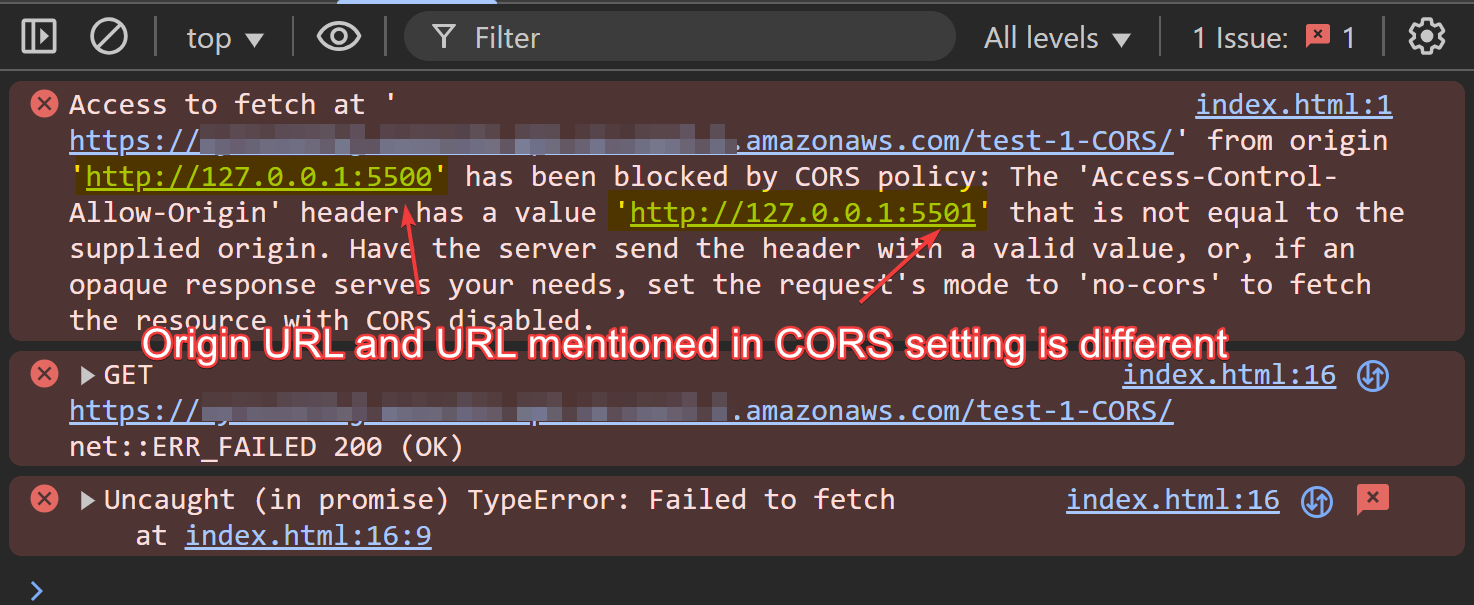
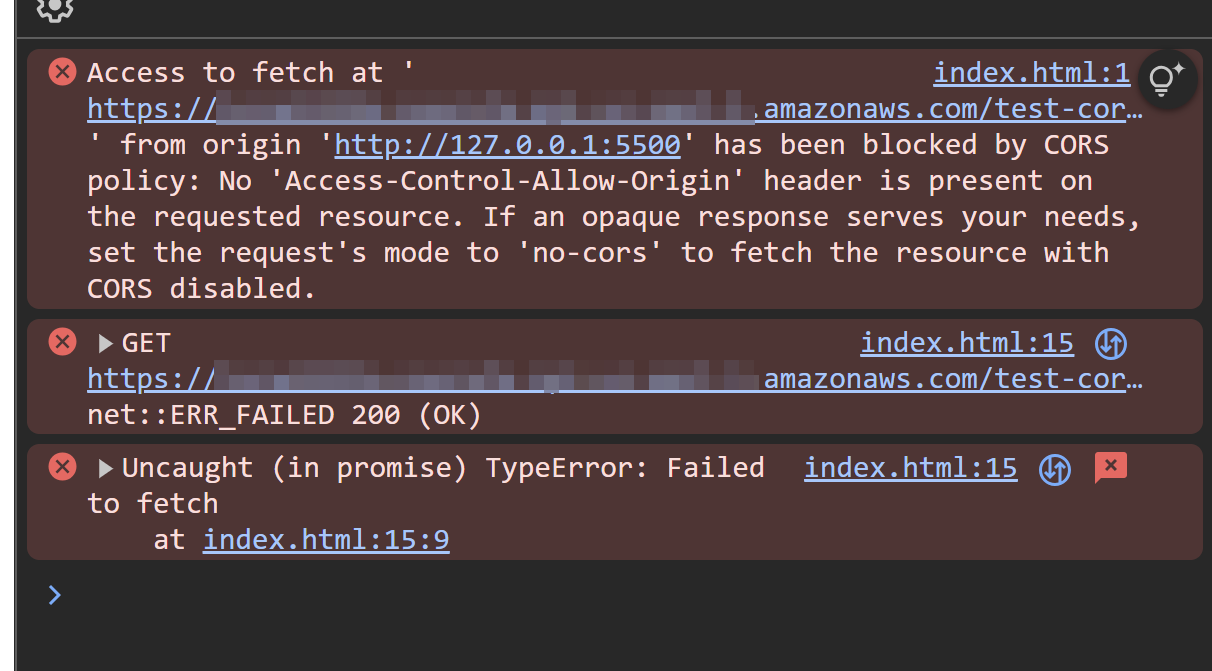
The above HTML page runs on http://127.0.0.1:5500 and fetch the REST API we previously created. If we mention a different IP (http://127.0.0.1:5501) in the CORS setting then we will get the following error:
We will now revert the CORS URL setting and include our original server’s URL:
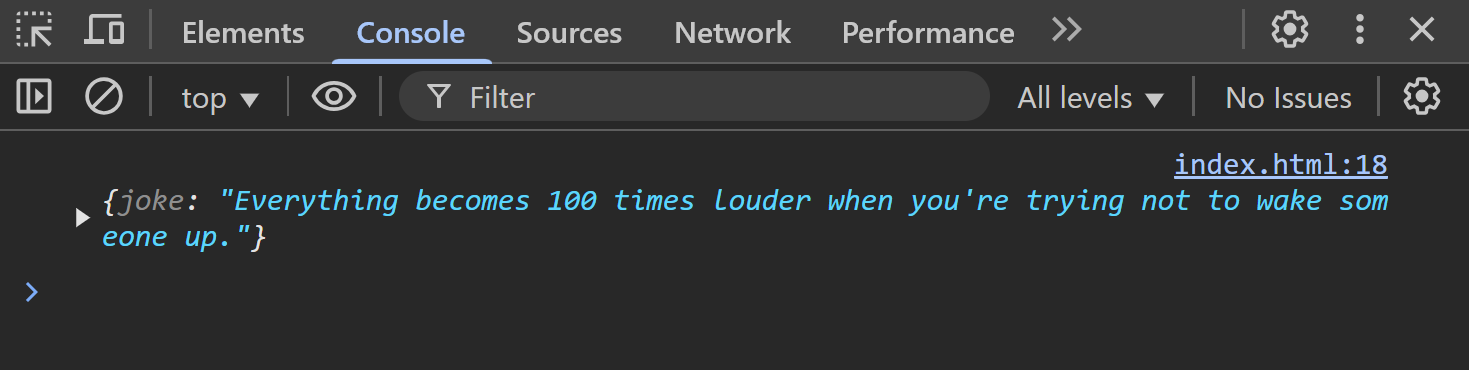
We will re-deploy the project and, fetch the API again. Now, the error has been resolved as in the following image we can see that we are successfully able to retrieve the response:
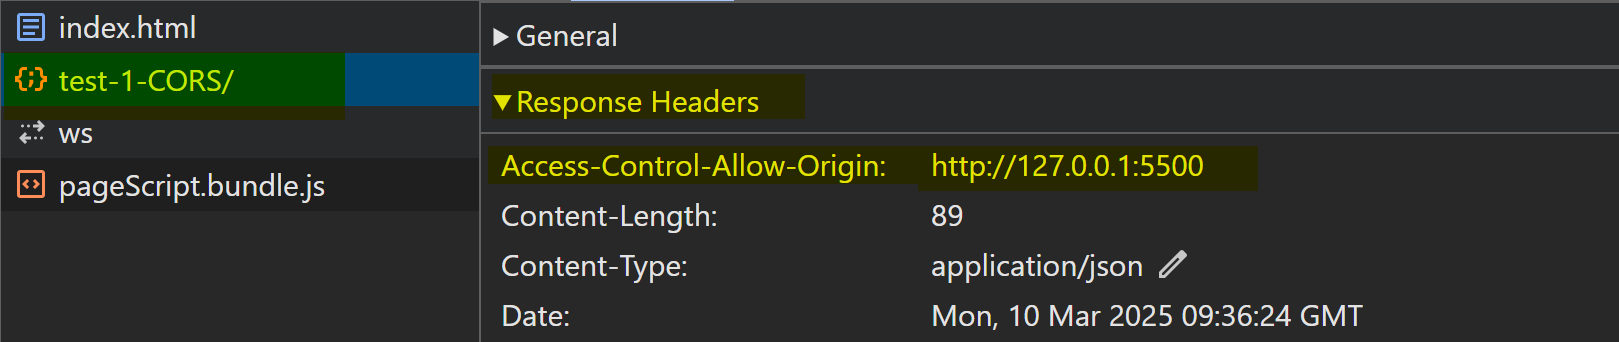
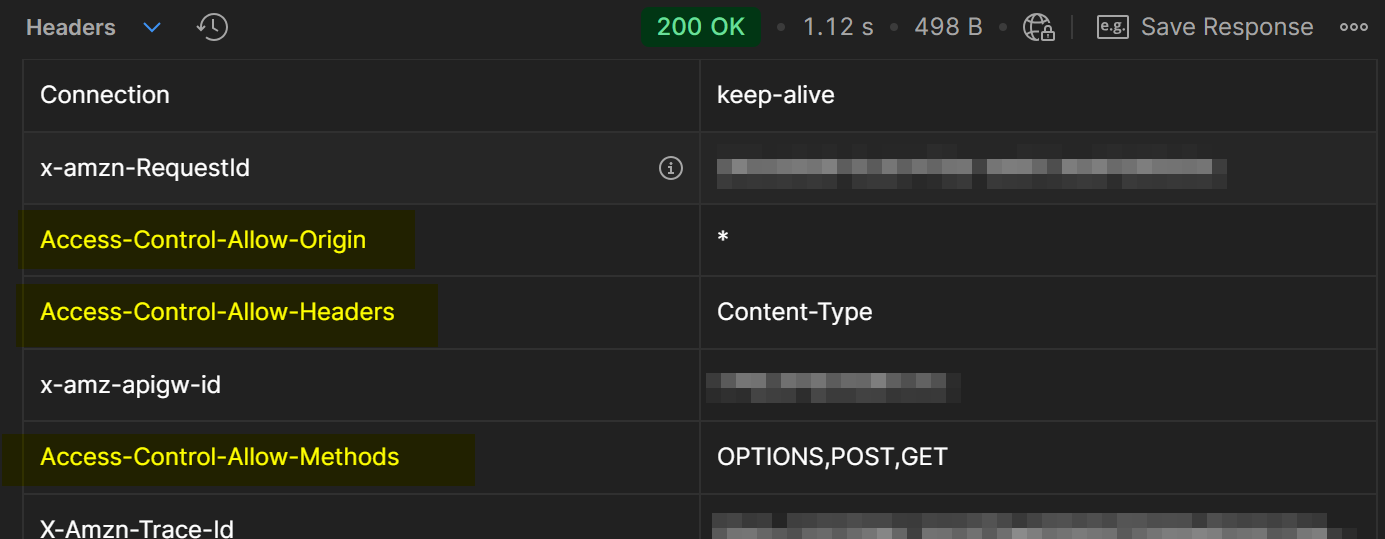
We can now check in the chrome-dev tool’s network bar that the response contains the CORS headers:
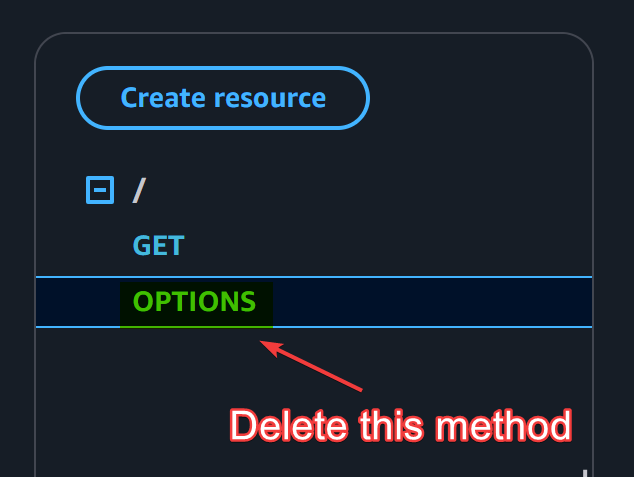
- Provide steps on how to redeploy the API to the default stage.
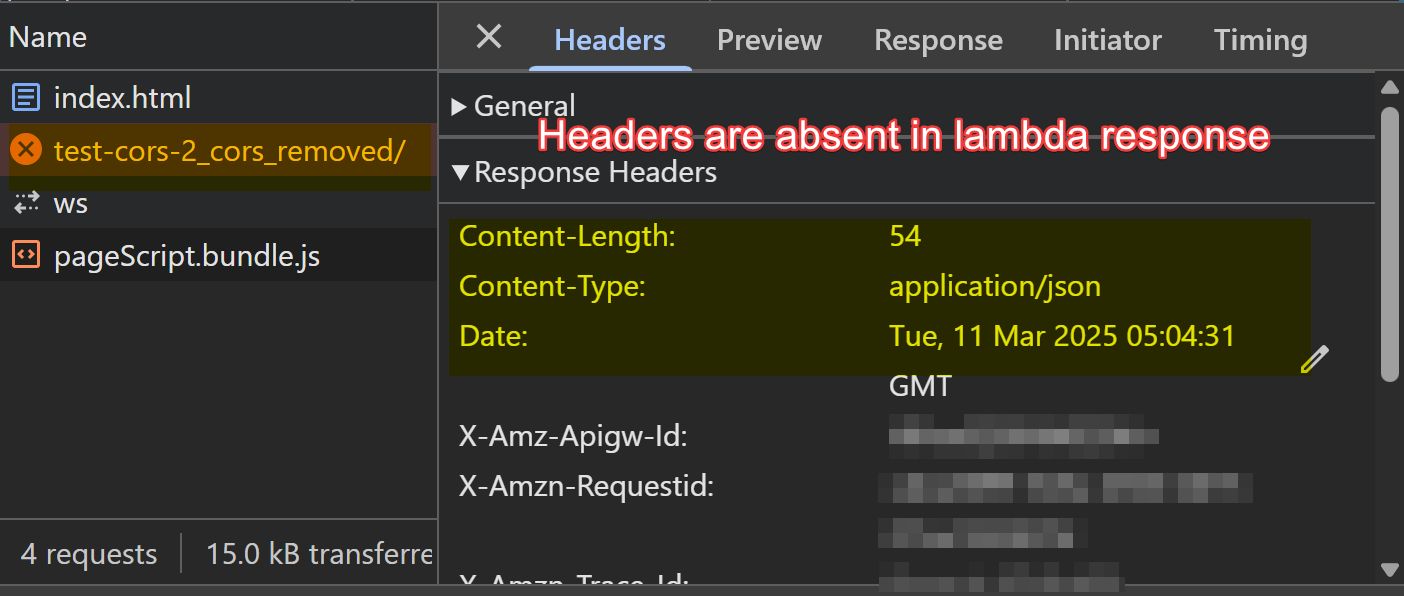
For this we will have to delete the OPTIONS method and remove the header information from method response and integration response . This will disable CORS and, we will get CORS error again in our browser as shown in the following images:
The dashboard should look something like this:
Errors reintroduced in browser console as headers are not being sent anymore.
Network tab:
Task 6: Lambda Code – Query vs. Path Parameters
Subtask 1 (6.1): Code Explanation
- Explain the difference between path parameters (e.g., /add) and query parameters (e.g., ?action=add)
Below is general example of a path variable :
...../resource/category/resource_1
Path parameters are embedded in the URL itself. These are mainly useful to identify resources or work with items that have hierarchical relationships. We can use this when the parameters are essential to identify a resource.
Below, is an example a route that deals with path parameters:
app.get('/users/:id', (req, res) => {
  const userId = req.params.id;
  // code ...
  res.render("index");
});
Below is an example of query parameter :
...../resource/category/resource_1?color=pink
Query parameters are key-value pairs sent after the ? in the URL. They are used to pass optional information in an HTTP request. This can be used in things like filtering, pagination etc.
A GET form will send details as path parameters to the backend if not specified at a POST form.
Below is a route that deals with query parameters:
app.get('/users', (req, res) => {
  const userId = req.query.id;
  // code ...
  res.render("users", {userId: userId});
});
Notice that we didn’t have to make dynamic URLs here like we had to make in path parameters.
The best practice for RESTful API design is that path parameters are used to identify a specific resource or resources, while query parameters are used to sort/filter those resources.
- Provide sample code snippets demonstrating how to handle query parameters in the Lambda function. Important: Each Lambda response must include CORS headers to allow cross-origin requests
Following is the lambda code that we will test on:
// file name: lambda_handler
export const handler = async (event, context) => {

  // extract query parameters
  const action = event.queryStringParameters && event.queryStringParameters.action; // this line is reponsible for extracting query parameter

  let result;
  if (action === 'add') {
    // Handle addition logic
    result = "Addition performed";
  } else {
    result = "No valid action provided";
  }

    // cors headers attached here
  return {
    statusCode: 200,
    headers: {
      "Access-Control-Allow-Origin": "*",
      "Access-Control-Allow-Headers": "Content-Type",
      "Access-Control-Allow-Methods": "OPTIONS,POST,GET"
    },
    body: JSON.stringify({ message: result })
  };
};
The above lamda code is linked to the below api stage:

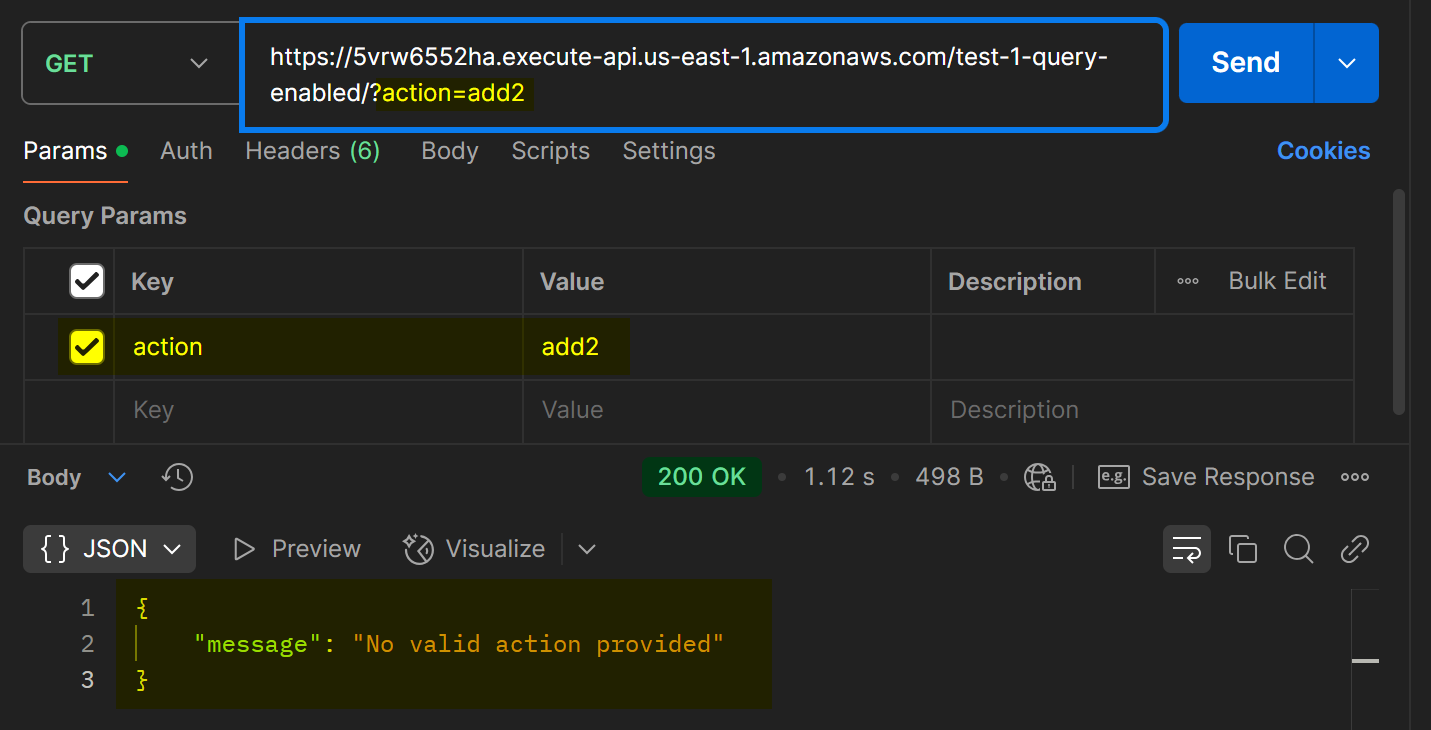
Triggering the api from postman gives the following result:

Changing the query parameters gives us:
The CORS headers are also present:
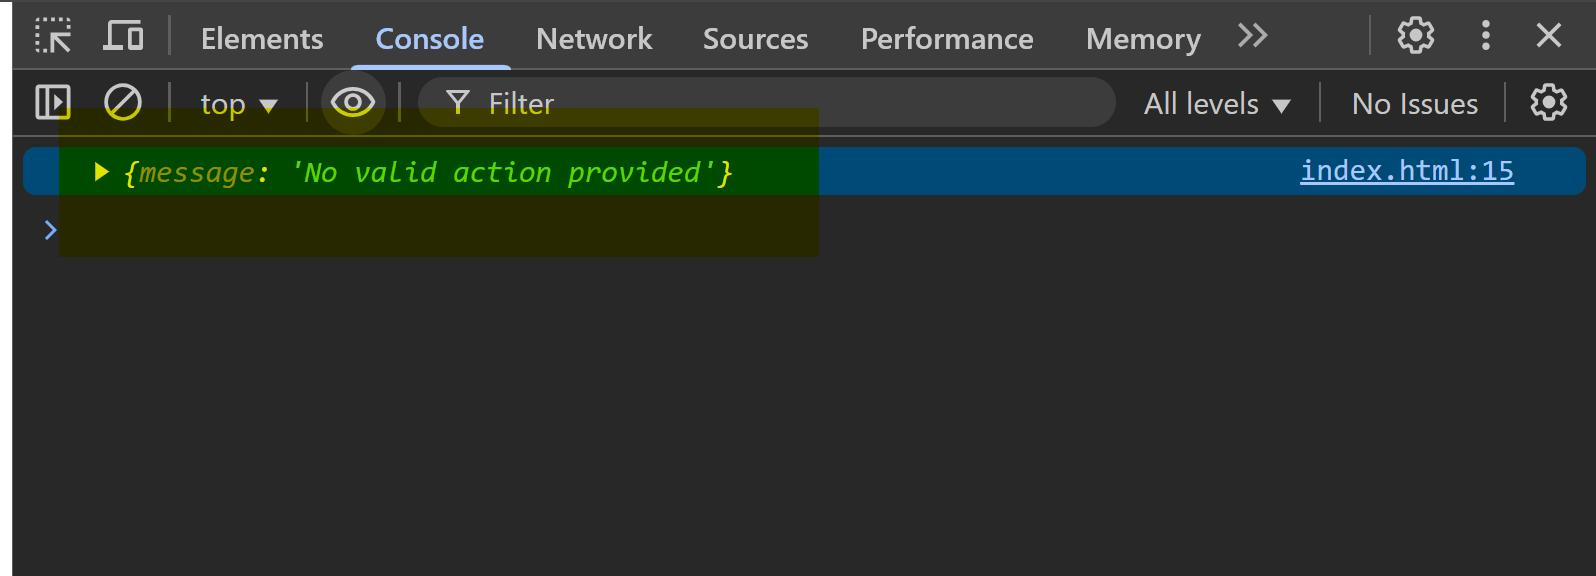
Browser console shows no CORS related errors:
Task 7: Serverless Architecture Overview
-
Define serverless architecture and its benefits (scalability, reduced management overhead, cost-effectiveness).
- Serverless architecture in simple words doesn't mean that you don't use a "server" at all. It means that the server's hardware and it's size (dynamically) is being managed by the provider.
- Serverless architecture is way to make apps wherein we don't have to manage the infra. We don't need to worry about scaling and maintaining the servers.
CORE BENEFITS:
- Automatically scales (unlike compute services like EC2 which will experience some downtime if you had to upscale to a bigger compute instance).
- Devs don't need to spend time managing the server itself and, can focus on building their core product.
- It is cost effective as you are only going to pay for the compute you have consumed unlike compute services like EC2 where you have to pay for the size you subscribe to.
EXAMPLES OF SERVERLESS APPS (AWS):
-
Explain how AWS Lambda works in a serverless setup.
- AWS lambda is an event based serverless service offered by AWS. Lambda contains certain scripts that execute in response some event (triggered api, image upload to S3 etc).
- It is considered as FaaS (Function as a Service) as we can focus on writing the function only.
- It follows all the principles of serverless architecture like automatic scaling on increased load, pay-as-you-go pricing, containerized execution (Lambda executes code inside a container).
Below is a basic AWS Lambda function:
export const handler = async (event) => {
  const reponse = {
      data: "This is a lambda function"
  };

  return response;
}; -
Discuss the importance of the
lambda_handlerfunction as the entry point for execution.- In AWS lambda, the
lambda_handler(ES5) orhandler(ES6) function serves as the entry point for execution. When an event (trigger such as adding something to S3 or API gateway) invokes the lambda function, AWS calls the handler function first. The handler decides what to do with the event and that’s why it is very important. - The
eventandcontextparameters contain details of the event and execution env. It can call other functions, interact with databases, trigger external services and return responses.
How AWS Lambda optimizes code
- AWS Lambda reuses execution environments across multiple invocations, enabling configurations to be loaded once and reused, thereby enhancing performance.
- Databases have connection overhead, so initializing the connection outside the handler function helps reduce it. If the connection is established inside the handler, a new connection is created for each invocation, resulting in unnecessary overhead.
- In AWS lambda, the
Task 8: Testing the API with Postman
Subtask 1 (8.1): Postman Setup
-
Show how to create a new request in Postman
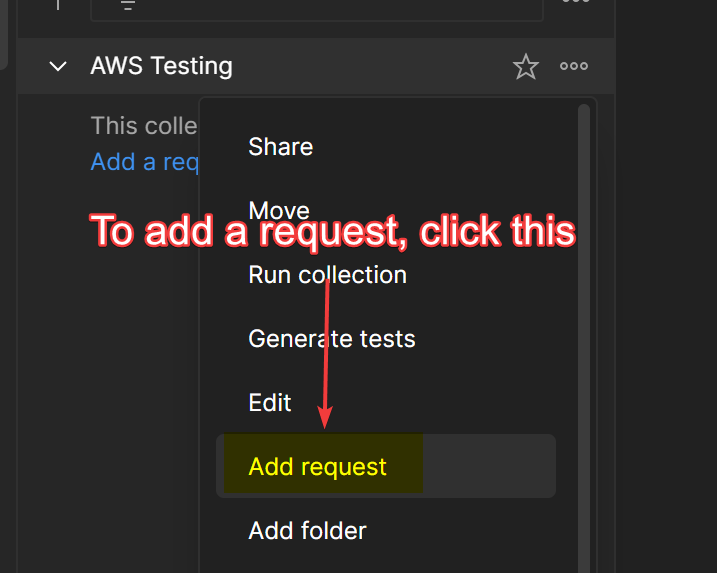
This will create a new GET request by default. You can customize it from here on:
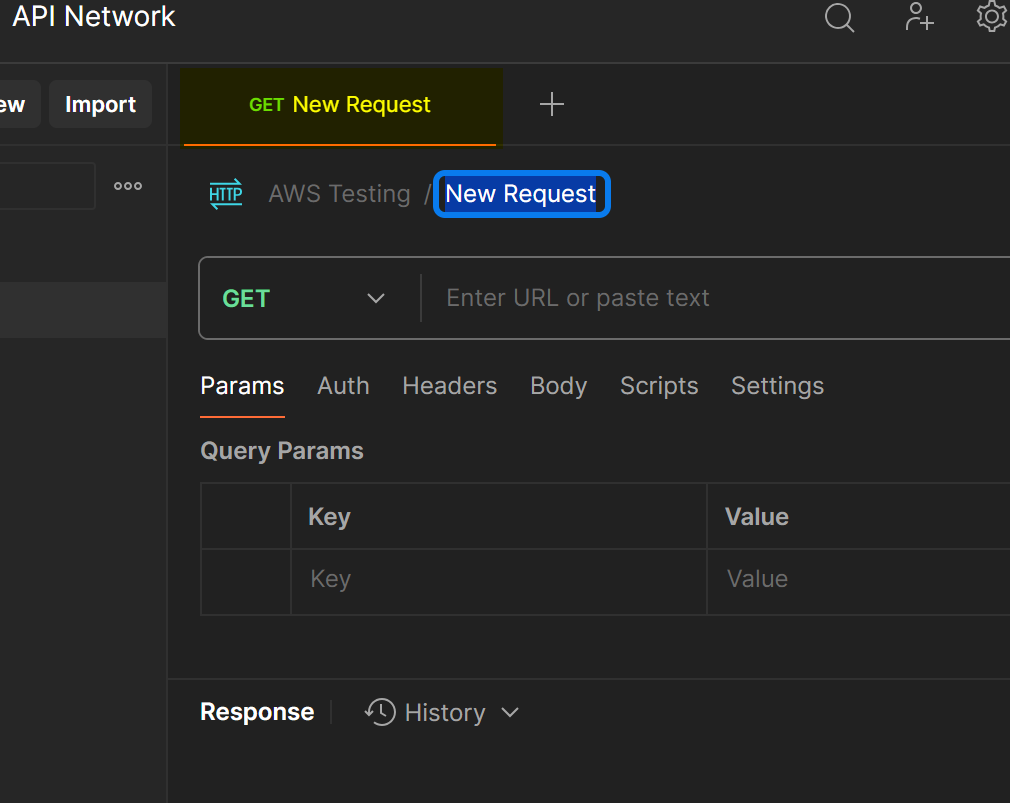
Click the GET button to choose which http request you want to send. Paste the URL and the response will be received the Response field as in the image.
Postman has been used many times in the previous section. Kindly refer the previous sections for how postman can be used.
- Provide details on setting up the URL for both query parameters (e.g.
<BASE_URL>?action=add) and path parameters (e.g.,<BASE_URL>/add).
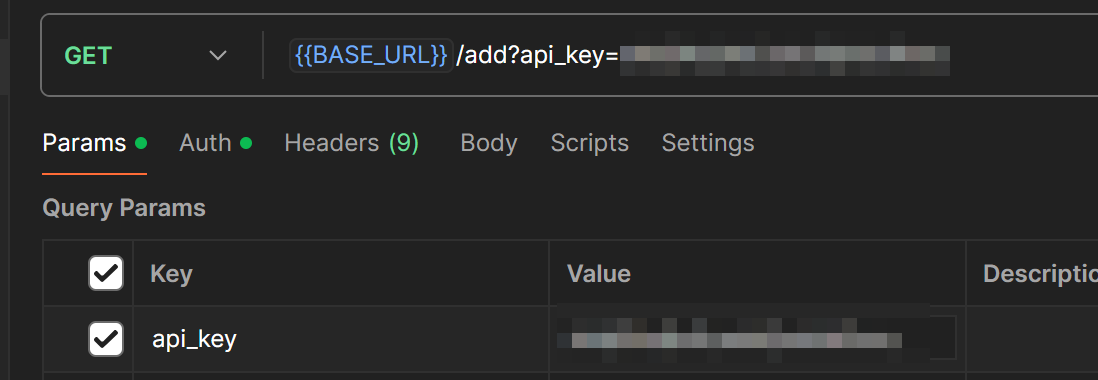
Triggering URL with Query Parameters
I have triggered a REST API in the following image while passing a query parameter:
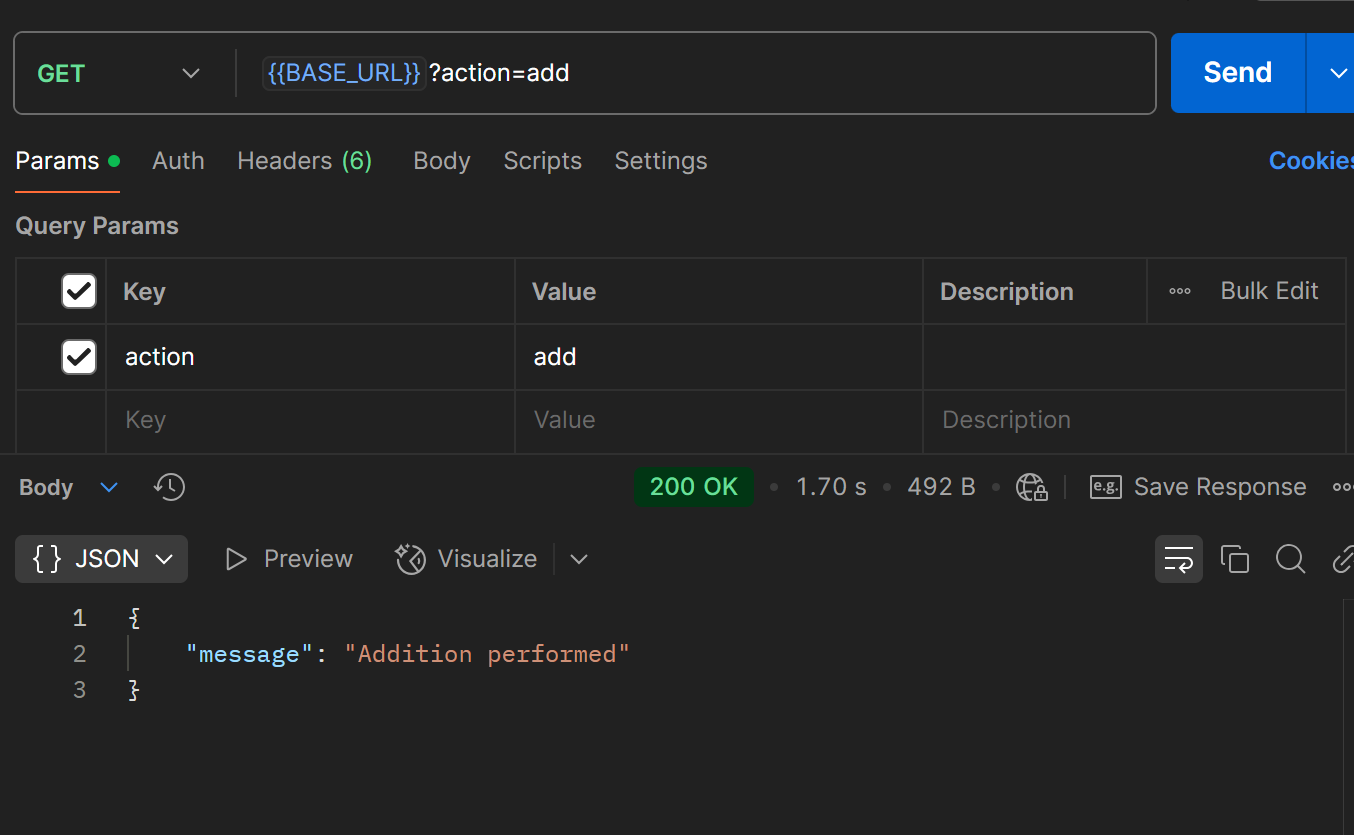
The base url here is the url of the api gateway REST API.
We can add as many query parameters as we want by writing them directly in the URL or mentioning them in the table Query Params that postman gives us.
Triggering URL with Resource Parameters
/add URL is different from a query string URL. We will need to make a new resource for that in API gateway:

We will link it to the original lambda function that we created earlier that returned a joke (which was in turn coming from node_modules directory from the layer that we attached to lambda function):

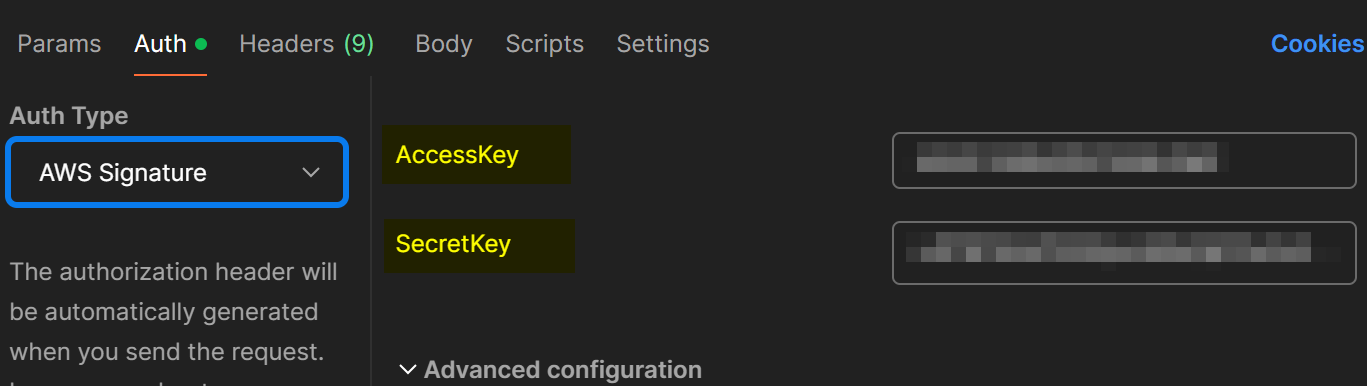
To enable IAM based access do the following:
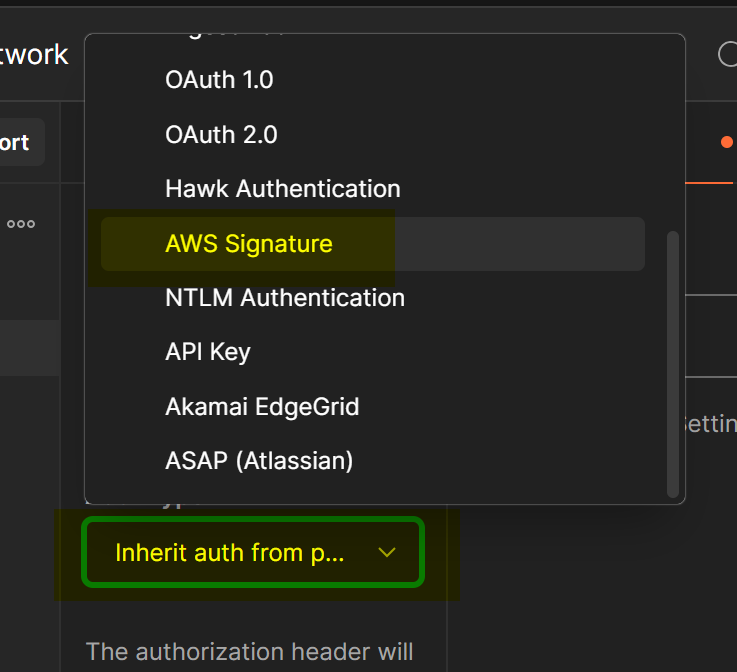
Click AWS Signature from Auth Type. Then enter the Access Key and Secret Key.
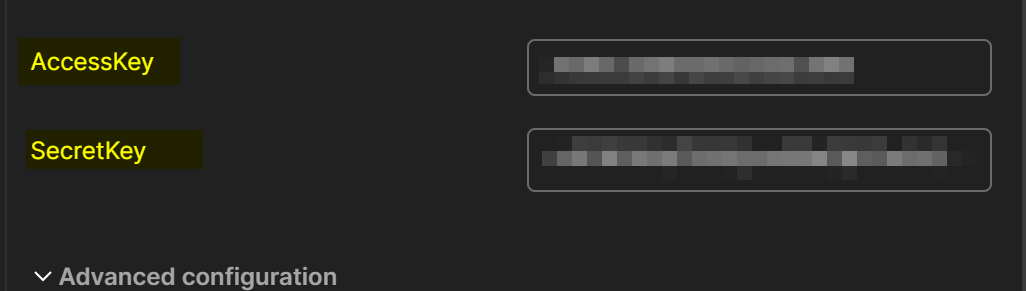
Now, your requests will be signed and the user will be authenticated on each request to the URL.
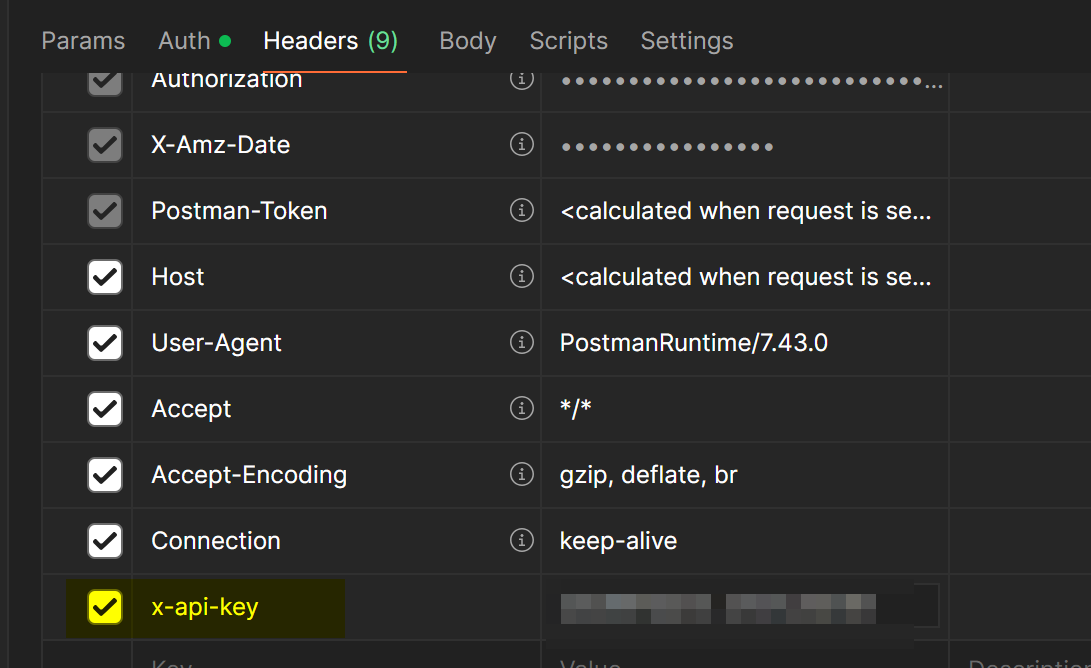
To enable API key feature, generate the API key from the AWS API Gateway service and pass it as a header in postman (note that you still have to sign your requests through AWS Signature):
Subtask 2 (8.2): Verification and Signatures
-
Demonstrate how to sign the API request when using IAM-based access.
This is done above in this assignment. The following image shows request signature process:
Generate access key and secret key from AWS portal and add it in postman as shown in the above images.
-
Explain the headers and query parameters required for an open key access method.
API key generated from api gateway or any other service can be used in postman too. You can include it as a header

To include api key in query string we can open the params section and include it in that.